
Question & Answers (Q&A)
This is a Question and Answer (Q&A) document originally generated as onsite help for an offline mDIS version (virtual box).
- Part 1: For the Every Day User
- What is the combined ID?
- How to login to mDIS?
- How can the core/section/sample/lithology/etc. input masks be accessed?
- How is new data entered?
- How does the navigation in mDIS work (hierarchy buttons)?
- Why does the hierarchy button not work?
- What is a "split"?
- What does "smart copy" do?
- How can the date or date/time be entered without using the calendar tool?
- How can an new item be added to a list?
- How to print labels?
- What information is displayed on the sample label and why does the combined_id look slightly different?
- What is IGSN?
- How can photos/documents be uploaded and attached to a record?
- An image was assigned to the wrong record. How can it be unassigned?
- How can data be exported?
- How is a new curator/person added to the system?
- Where are new Sample Requests entered?
- A few things that could make life easier
- Part 2: For the More Advanced User
- How to start mDIS (offline version)?
- How to turn off mDIS?
- Where are backups stored (offline version)?
- How can a complete system backup be made (.ova-file)?
- How is a new mDIS Instance imported (.ova-file) and when should that be done?
- What to do if mDIS freezes?
- Why is access to mDIS via the host PC (Windows) browser not possible anymore?
- How to create a new login account?
- Where to check if the core recovery equals the sum of the section lengths?
- How to change the local time in the virtual box?
Part 1: For the Every Day User
What is the combined ID?
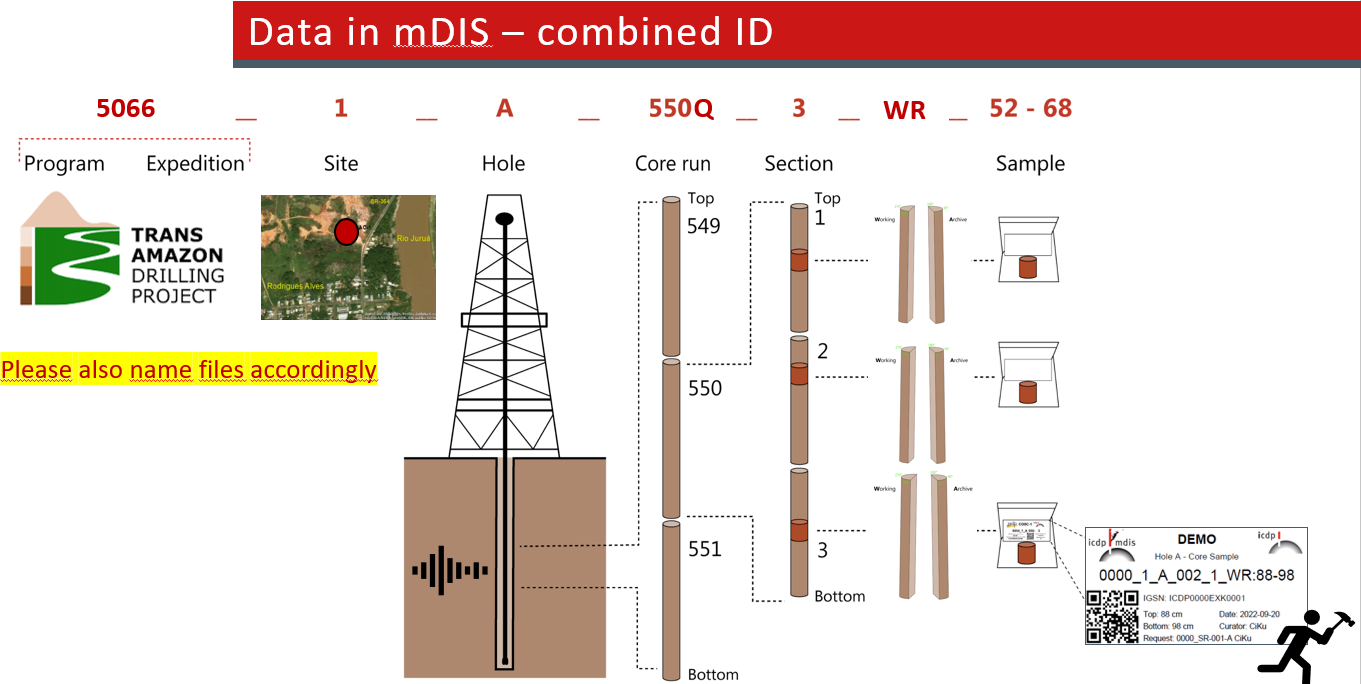
It is the ICDP hierarchical identifier. Every record in the main hierarchy can be exactly identified by its combined ID. Everyone in the project working with its data should be familiar with it. In the ICDP database the project identifier usually consists of 4 digits, starting with 50XX.
How to login to mDIS?
Open the browser on the onsite mDIS laptop. In the bookmarks bar should be an entry “offline mDIS”. Click that. If that is not available type http://localhost:8888/ in the browser address line. The login screen will open. Type in the username and password. If a personal login is not available ask a system administrator to create it for you.
How can the core/section/sample/lithology/etc. input masks be accessed?
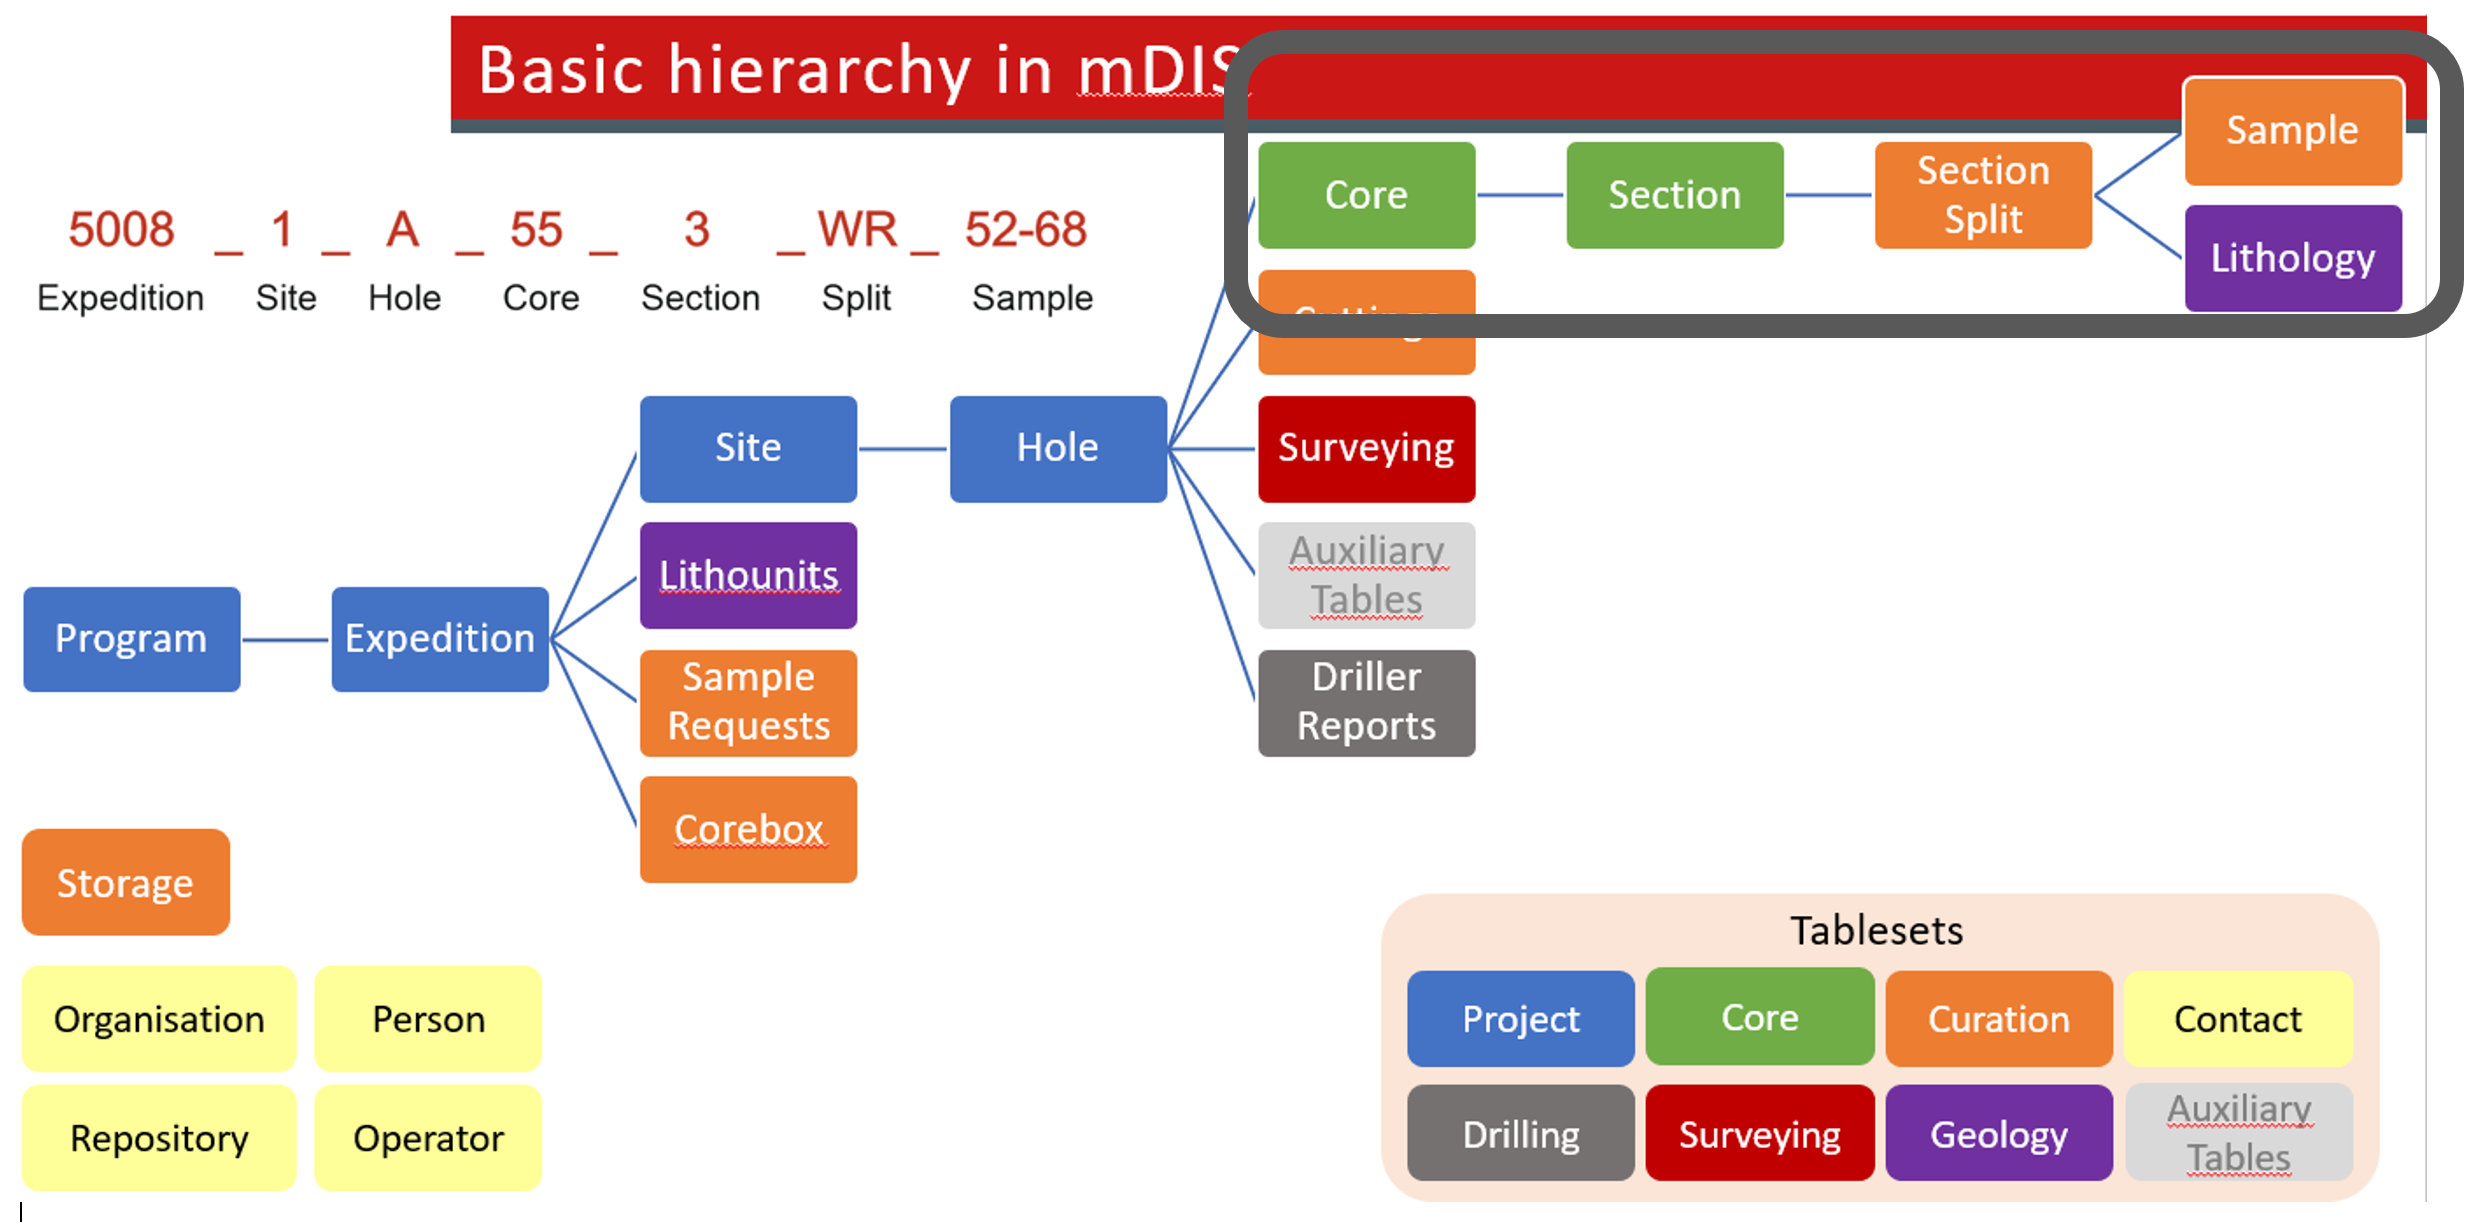
mDIS is structured hierarchically, usually starting on the highest level with Project -> Program. All forms are hierarchically linked by a parent and child relationship. For example, Hole is the parent to Cores, whereas Cores is a child to Hole. mDIS follows the ICDP hierarchy, but has additional options like sample request curation or input of driller logs or curation of geophysical logging or testing data.
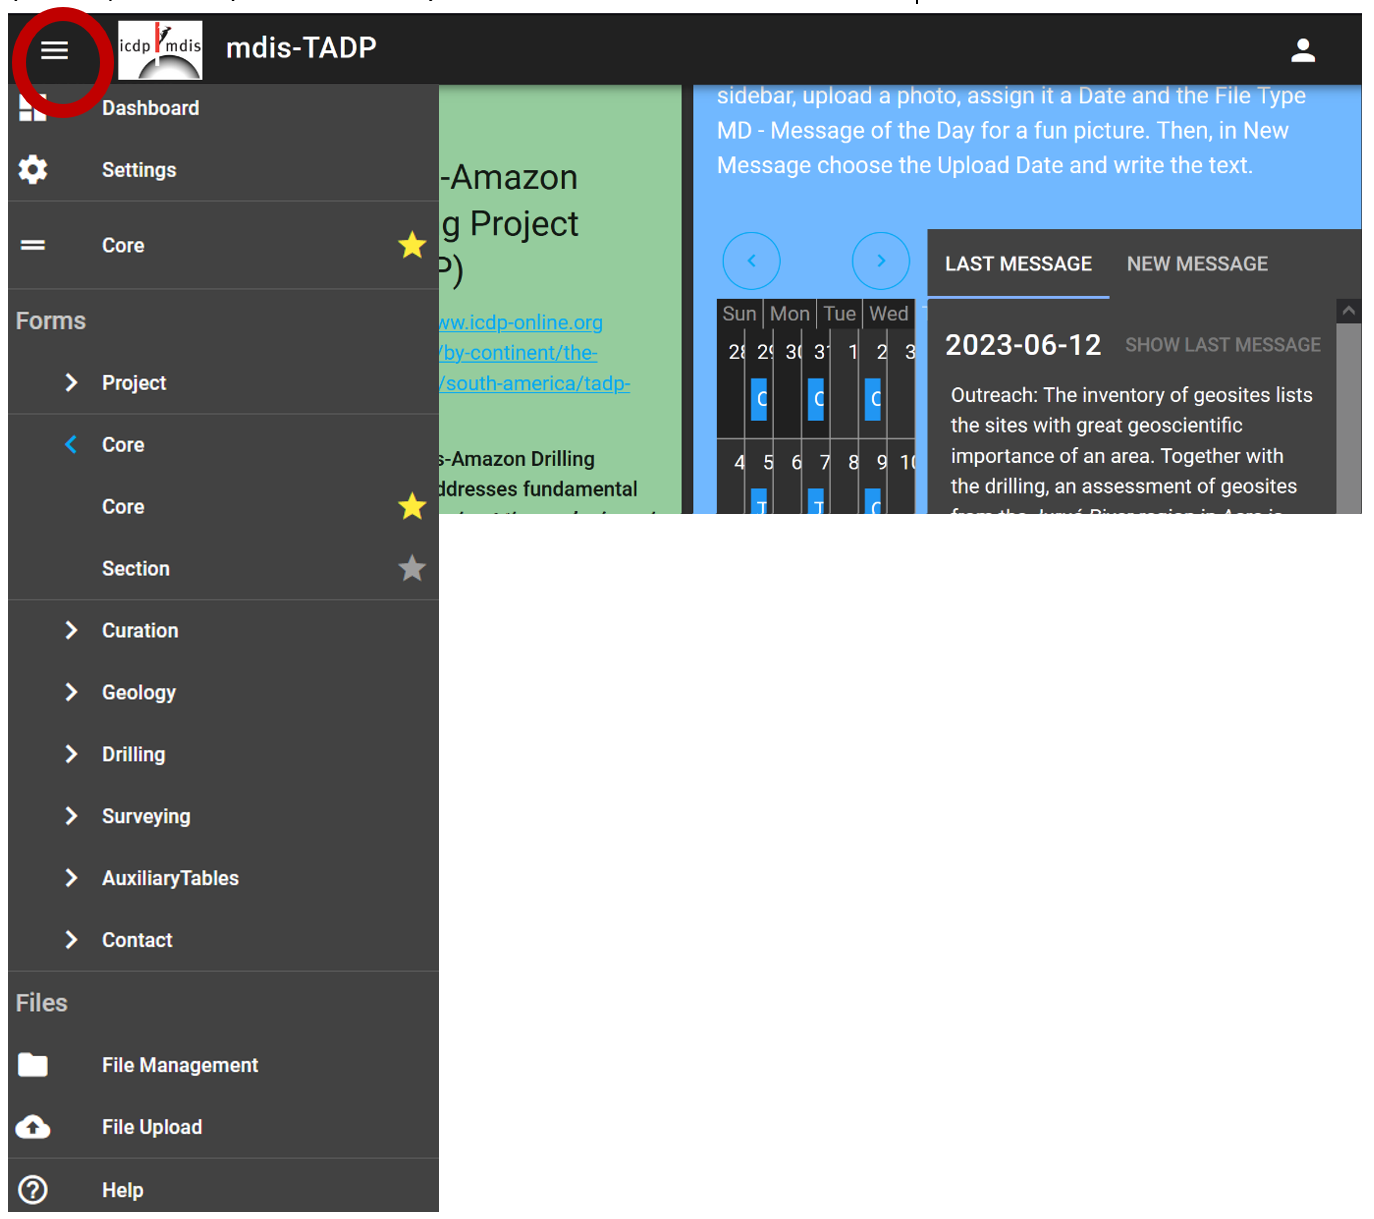
To see the data stored in the mDIS, open the sidebar by clicking the burger menu (red circle in picture) which opens an overlay with several forms to choose from.
At the top, the dashboard and setting icons are visible. Furthermore, all forms available in this mDIS instance are listed grouped by Project, Curation, Contact, Core, Drilling, Geology, etc…This reflects the tablesets in the hierarchy diagram. Click on one of those groups to open the list of contained forms. Depending on the mDIS instance and the access rights these groups and forms can differ. Click on a form to open the input mask. To easily access frequently used forms, mark them as favorites by clicking on the star next to the form name. The favorite forms are shown at the top. A favorite can be removed by unchecking the star. The favorite forms are saved in the user profile. The list of uploaded files and the form to upload new files can be found at the bottom of the sidebar.
How is new data entered?
Click on a form in the sidebar to open input form. Each form consists of several items.
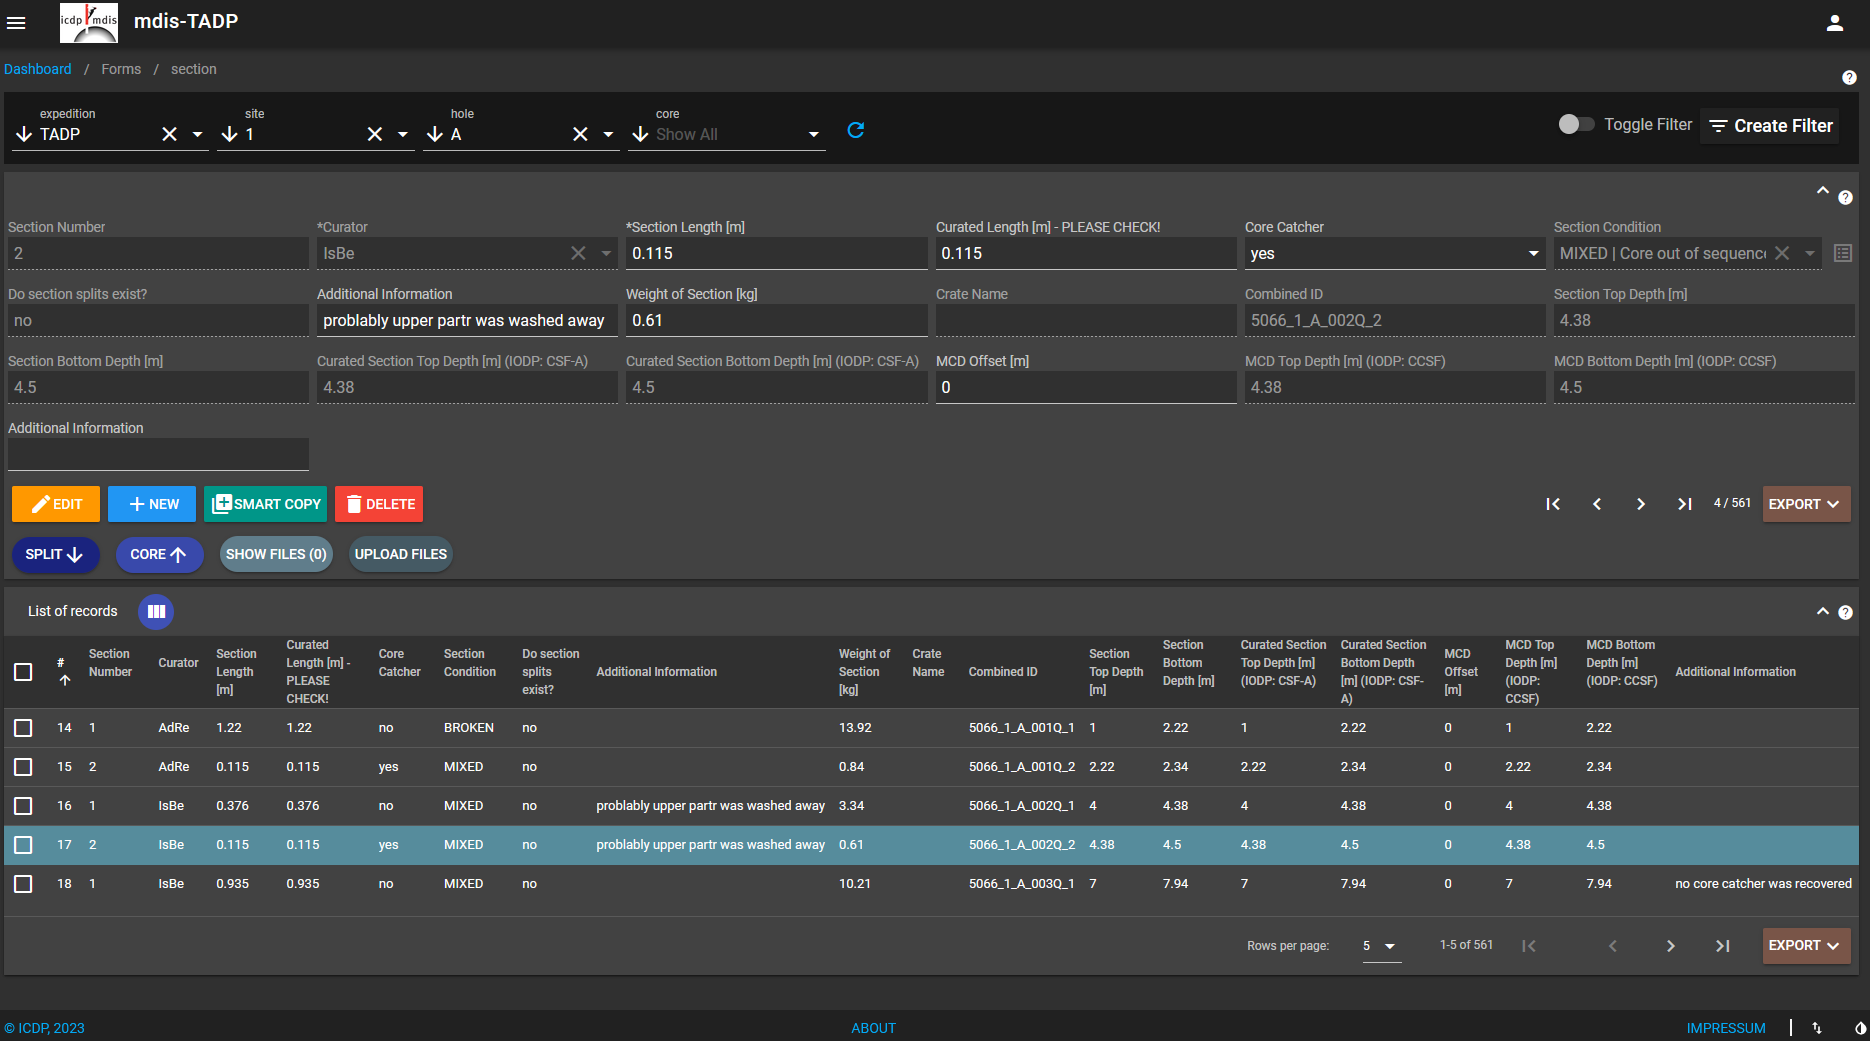
The filterbar at the top:
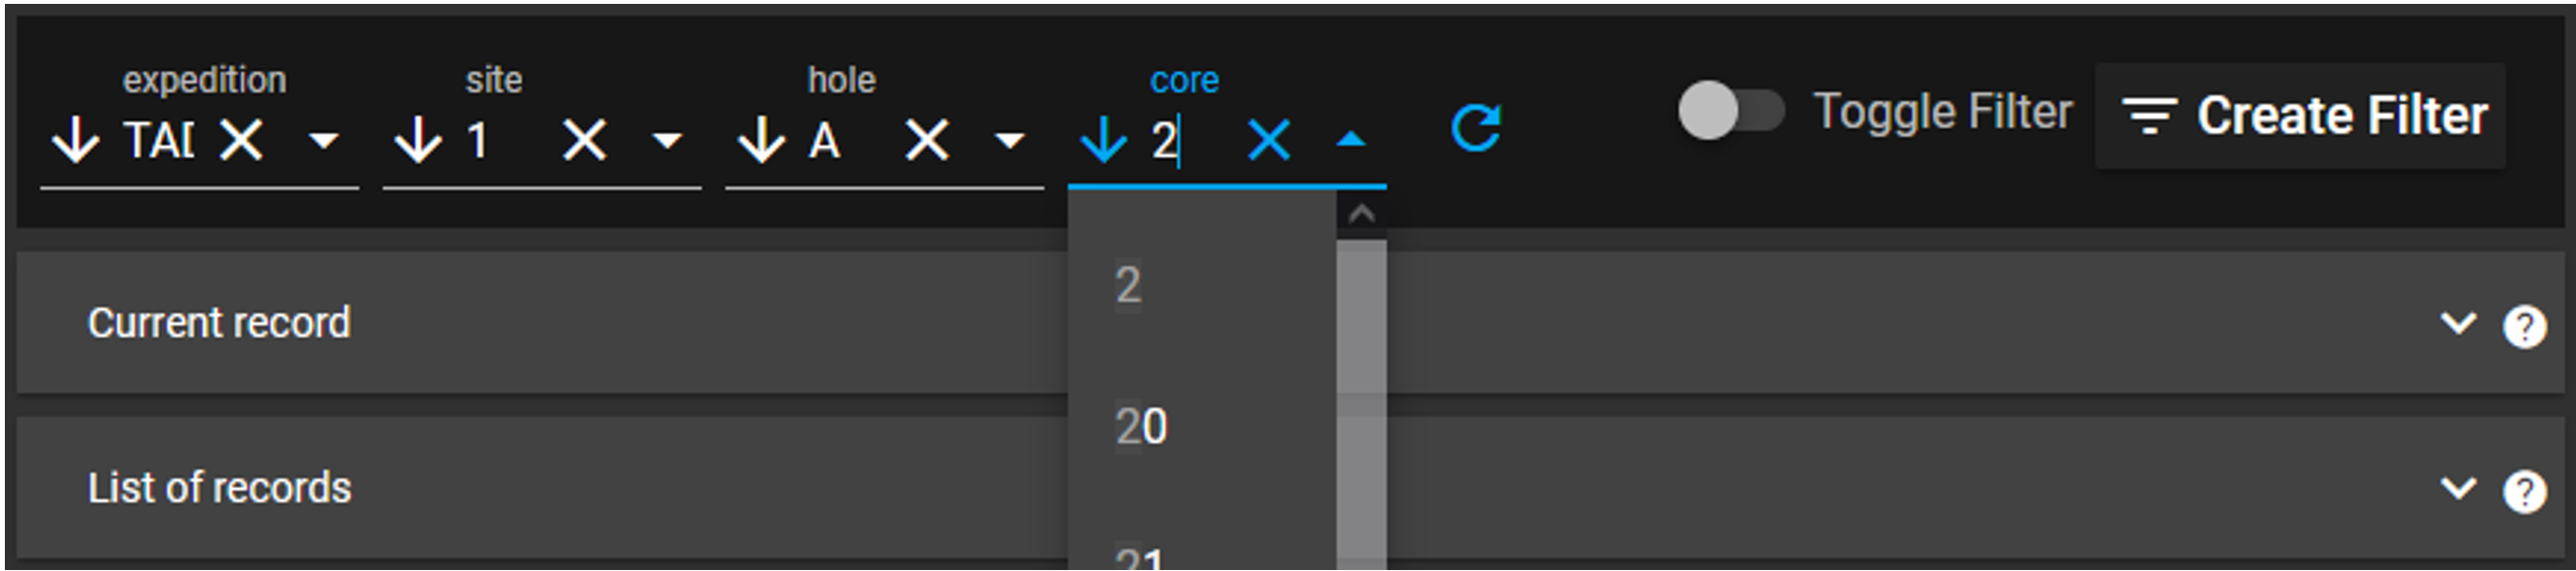
Fill the hierarchy to reflect the data record. E.g. To enter a new section, fill the filter bar up to core. Only than it is possible to enter new data. To see all records in a table, e.g. all cores of hole A, delete the selection of core by clicking the X. Extra info: if there are already a lot of cores in the database, use the arrow next to e.g. core and change the sorting direction. Alternatively, it is also possible to type the correct number. Auto completion is available.
List of Records: A list of all available data with regard to the set filter condition.
Current Record: If a record in the "list of records" panel is selected, the "current record" panel is expanded. Click “new” or “smart copy” (if possible) and start entering new data.
How does the navigation in mDIS work (hierarchy buttons)?
To navigate from one form to another, either chose the form from the sidebar or use the hierarchy buttons in the form. If chosen from the sidebar, the filterbar needs to be filled manually. If the hierarchy buttons are used, the filterbar is already set in the new form.
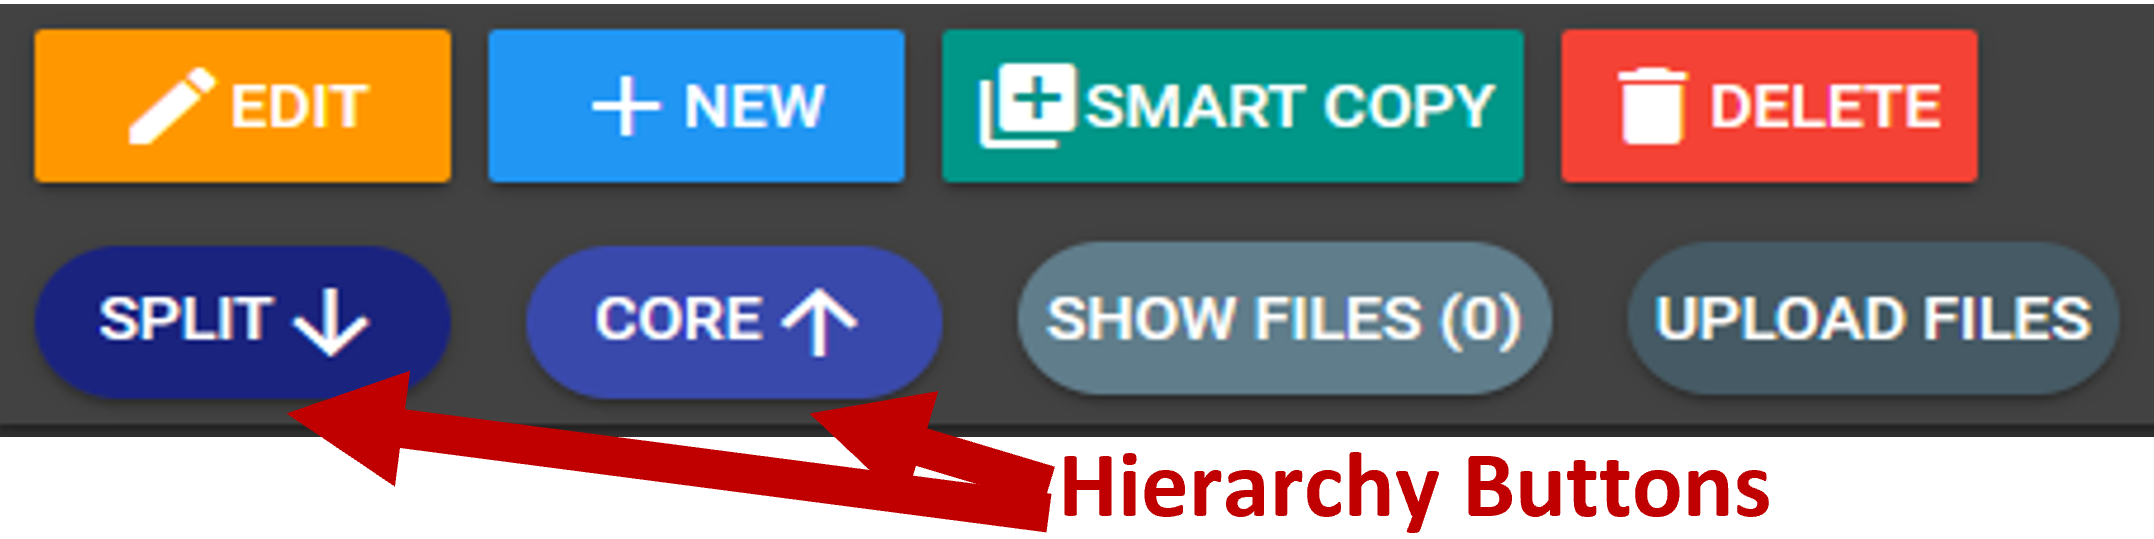
The data structure of mDIS is strongly hierarchical. The hierarchy buttons open the parent (core) and child (split) forms in a new tab.
- If the button is clicked to access the parent form (here "core"), the (one) record with the parent of this current record is displayed in that form in a new browser tab.
- If the button is clicked to access a child form (here "split"), all the records which are children of this current record are displayed in that form in a new browser tab.
Why does the hierarchy button not work?
Usually this is because the popup blocker is enabled. Please disable the popup blocker for this site directly in the browser.
What is a "split"?
A Split is a core section that is cut along its long axis. By default, 3 different kinds of splits are available in mDIS. The Whole Round “WR”, the Working Half “W” and the Archive Half “A”. For every section that is entered in mDIS a Whole Round split is automatically generated. To navigate to sample or lithology with the hierarchy buttons go from section via split to sample/lithology.
What does "smart copy" do?
Smart copy works like “new”, but some fields are already prefilled or automatically calculated. Furthermore, all fields from the previous record are copied in and can be modified (if allowed). This is especially useful, if only some of the information changes from one record to the next (e.g. in section).
How can the date or date/time be entered without using the calendar tool?
Click on the icon (watch or timer) next to the date or date/time field in editor mode in any form. It will set the present time or date/time. Please note, that all times saved in mDIS are automatically converted to UTC. Make sure that the time zone of your operating system (host/guest) is the same as the time zone of the drill site.
How can an new item be added to a list?
This is only possible in edit mode. Open the form that contains the list to which an item should be added. Click new or edit on an existing record.
Every field that has a list/sheet icon next to it contains a list. Click on the icon and a new window will open. Add a value in the field “Abbreviation” and click create. Close this window and the new item is available in the dropdown menu.

Be aware that some lists may be locked by a system administrator and cannot be changed by a user/operator (controlled vocabulary). If there is a need to add an item to a locked list, please ask a system administrator.
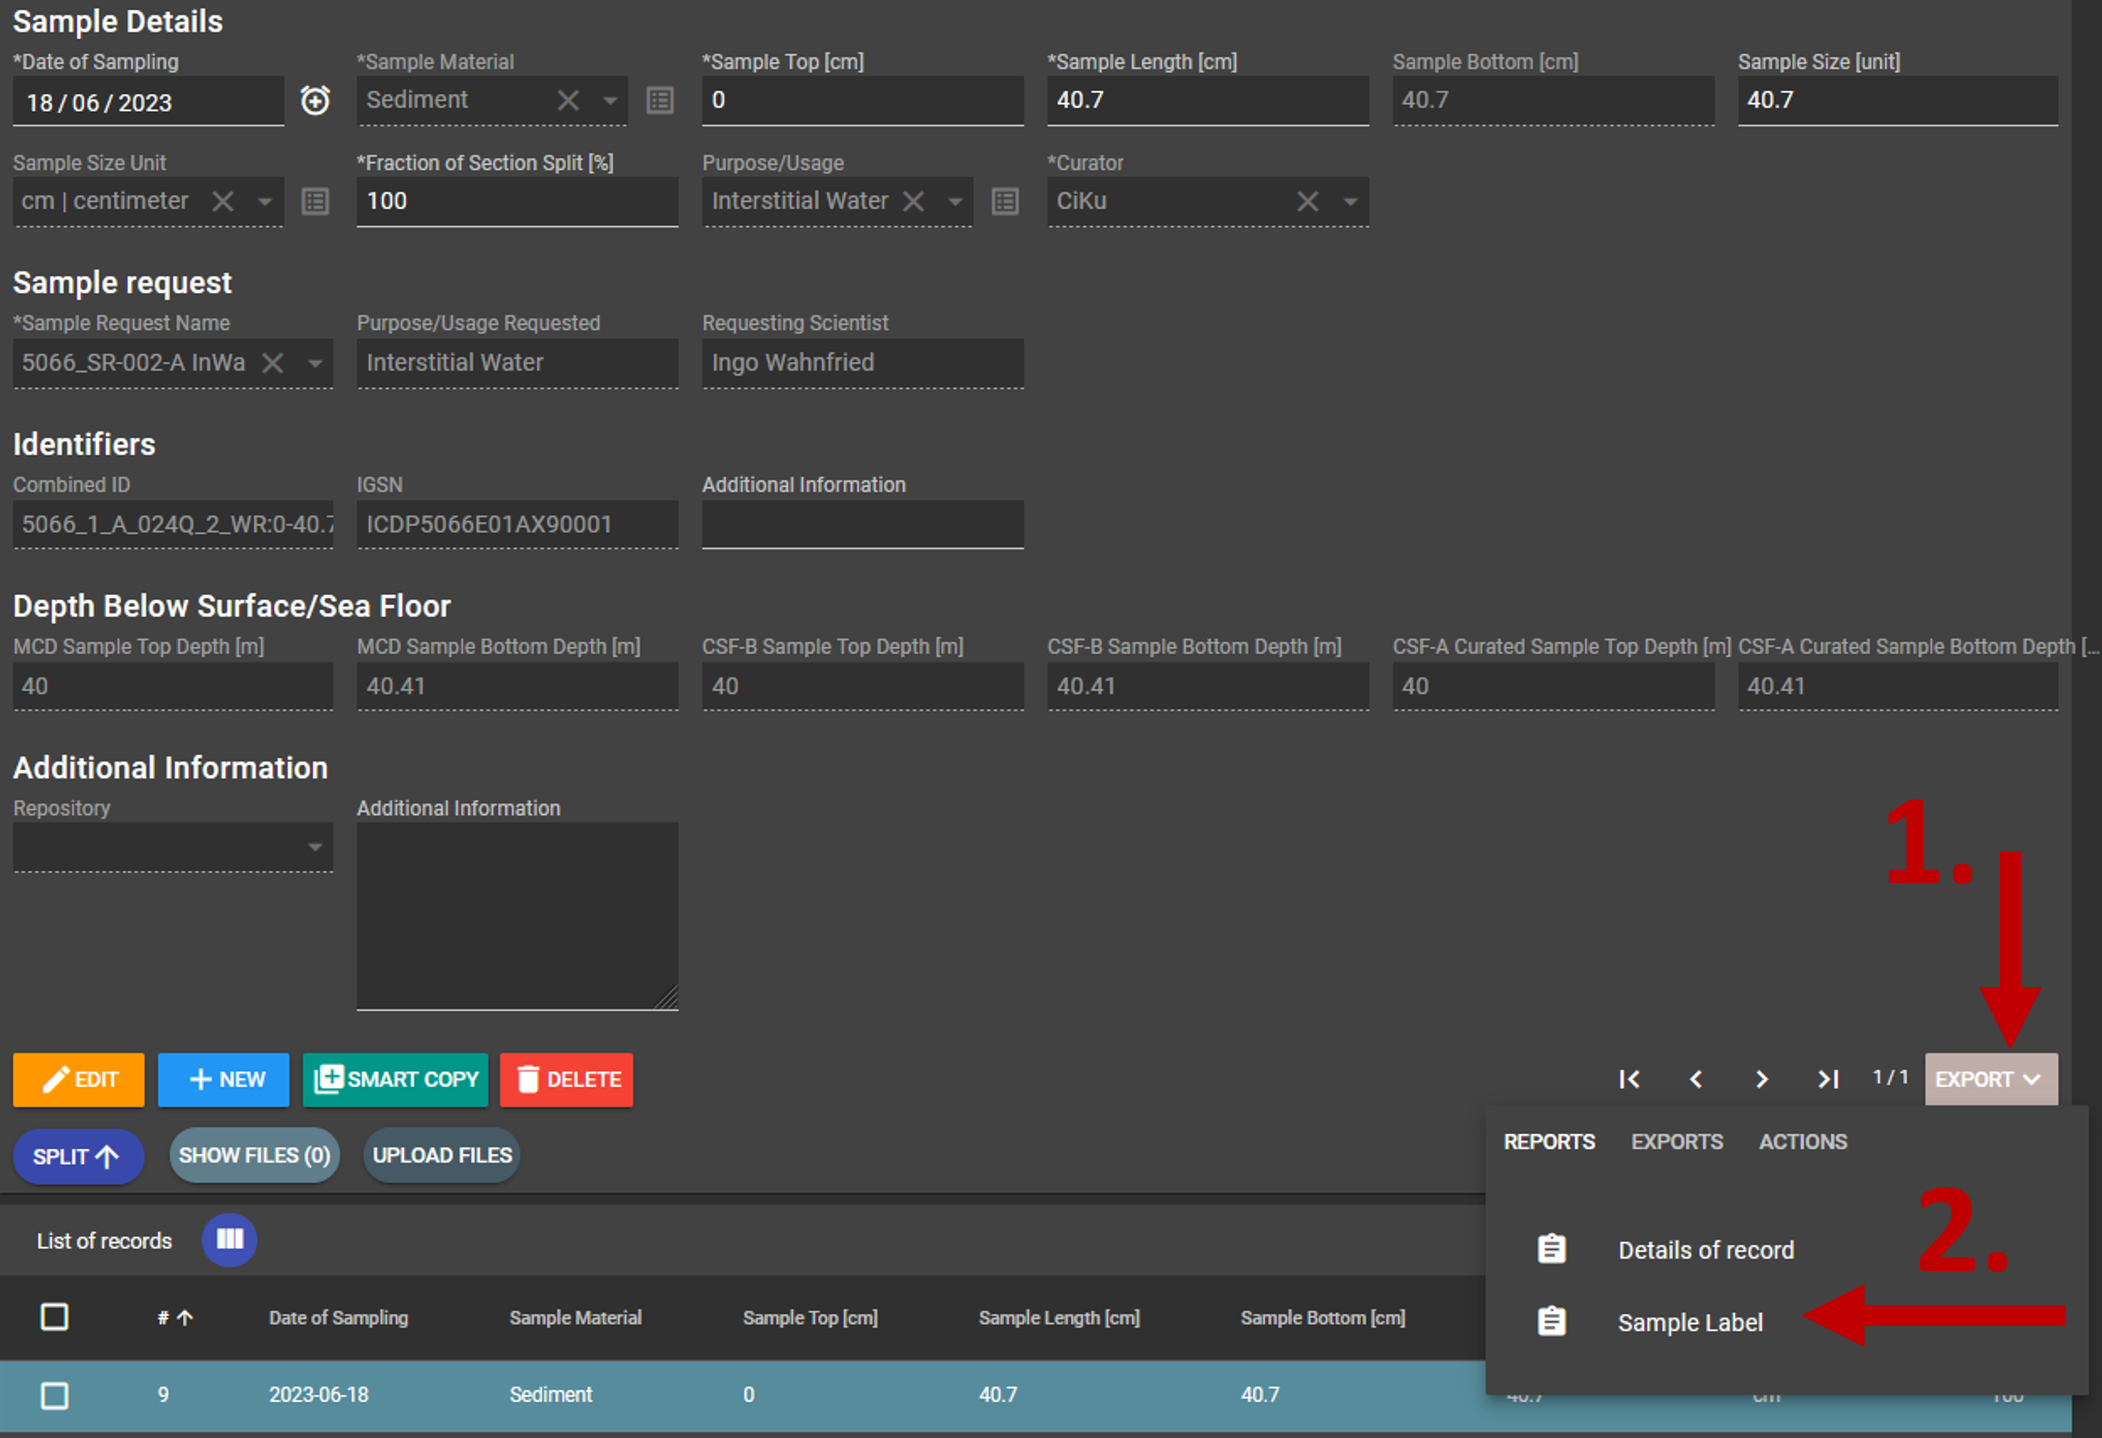
How to print labels?
By default mDIS contains some labels for coreboxes, sections, samples and cuttings.
For example, once sample data is entered, it is possible to print labels. Select a single sample in current record or print several labels for different samples by selecting the samples in list of record. Click on the brown Export button -> Sample Label. The label will be either open directly in your browser window or it will be downloaded as PDF. Open the file and go to File -> Print. Chose the correct label printer and print. If the laptop was restarted recently, it may be possible that the correct printer settings have to be set again. Open the PDF->File->Printer.
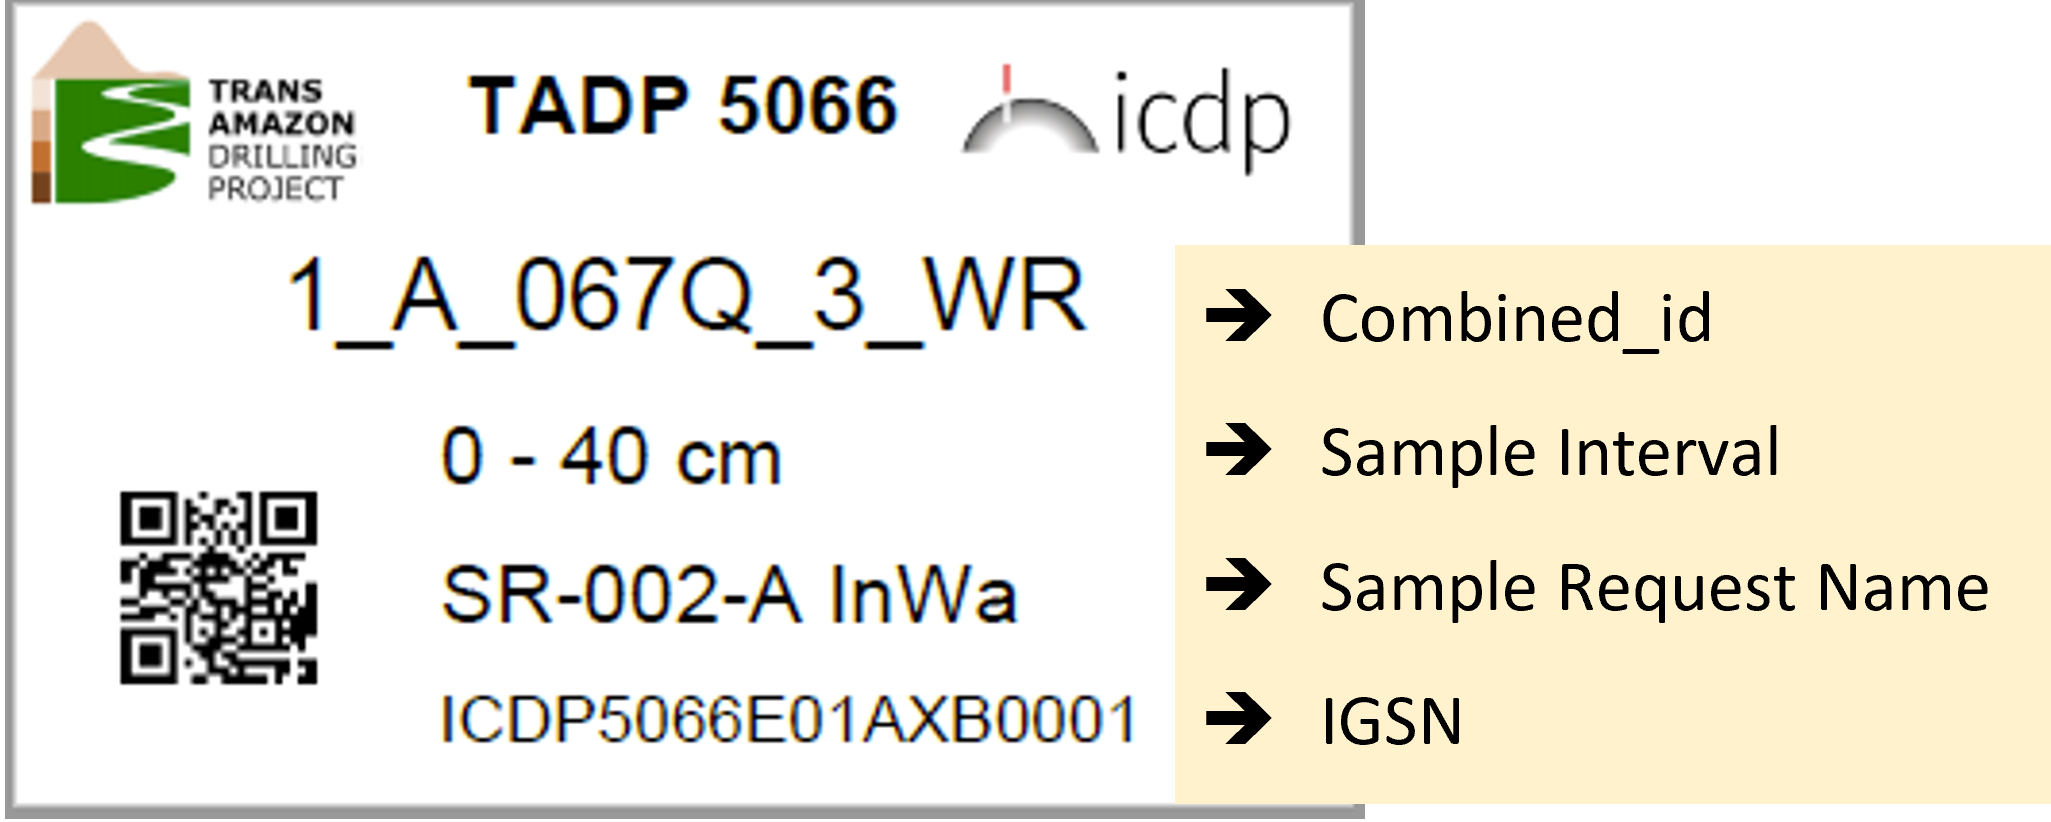
What information is displayed on the sample label and why does the combined_id look slightly different?
The combined_id is shortened, so that the information is better readable on a small label. But all of the information is there. The expedition name and number are displayed at the top of the label. After a line break the rest of the combined_id shows up, starting with the site number.
What is IGSN?
It is a persistent identifier for physical samples, like a DOI for publications. For more information see: https://www.igsn.org/
How can photos/documents be uploaded and attached to a record?
The upload button allows to upload and assign files to the current record. The form "Files Upload" is opened with preselected filters for the current record. E.g. to add a section photo to the corresponding section. In the section form select a current record to which the photo should be assigned and click “Upload Files".
The upload files form will open with already prefilled hierarchy settings. To add a new photo, click on the top of the upload area (greenish dashed line) and chose files from your explorer. Alternatively, you can also drag and drop a file into the upload area. Once the photo is uploaded it occurs in the files upload directory. Select the correct file.
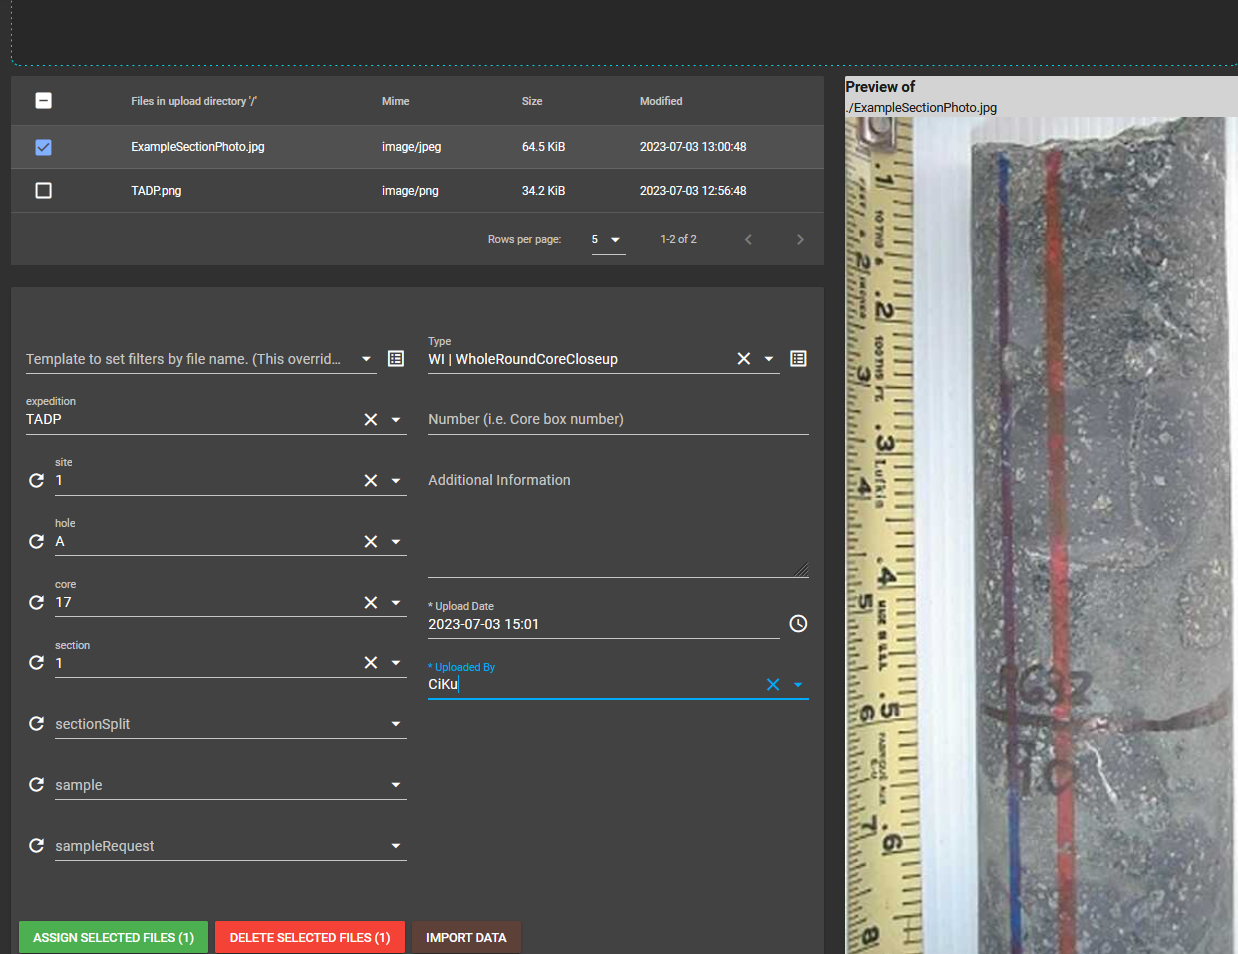
Then specify the “Type”, the “Upload Date” and the “Uploaded By” fields and click “Assign Selected Files”. Once the file is successfully uploaded it will disappear from the upload directory. To view the assigned file go back to your current record, refresh the page and click “Show Files”. That will open the File Management and show you all files that are attached to this record.

An image was assigned to the wrong record. How can it be unassigned?
If a file is assigned incorrectly, it is possible to unassign it. Open the File Management from the Burger Menu and filter for the wrong record. Either use the filterbar or the "Create Filter" button. Once the wrongly assigned image is found unassign it by clicking on current record->un-assign. The file will be automatically transferred back to the file upload directory. By using the delete button, the file will be deleted from the database.
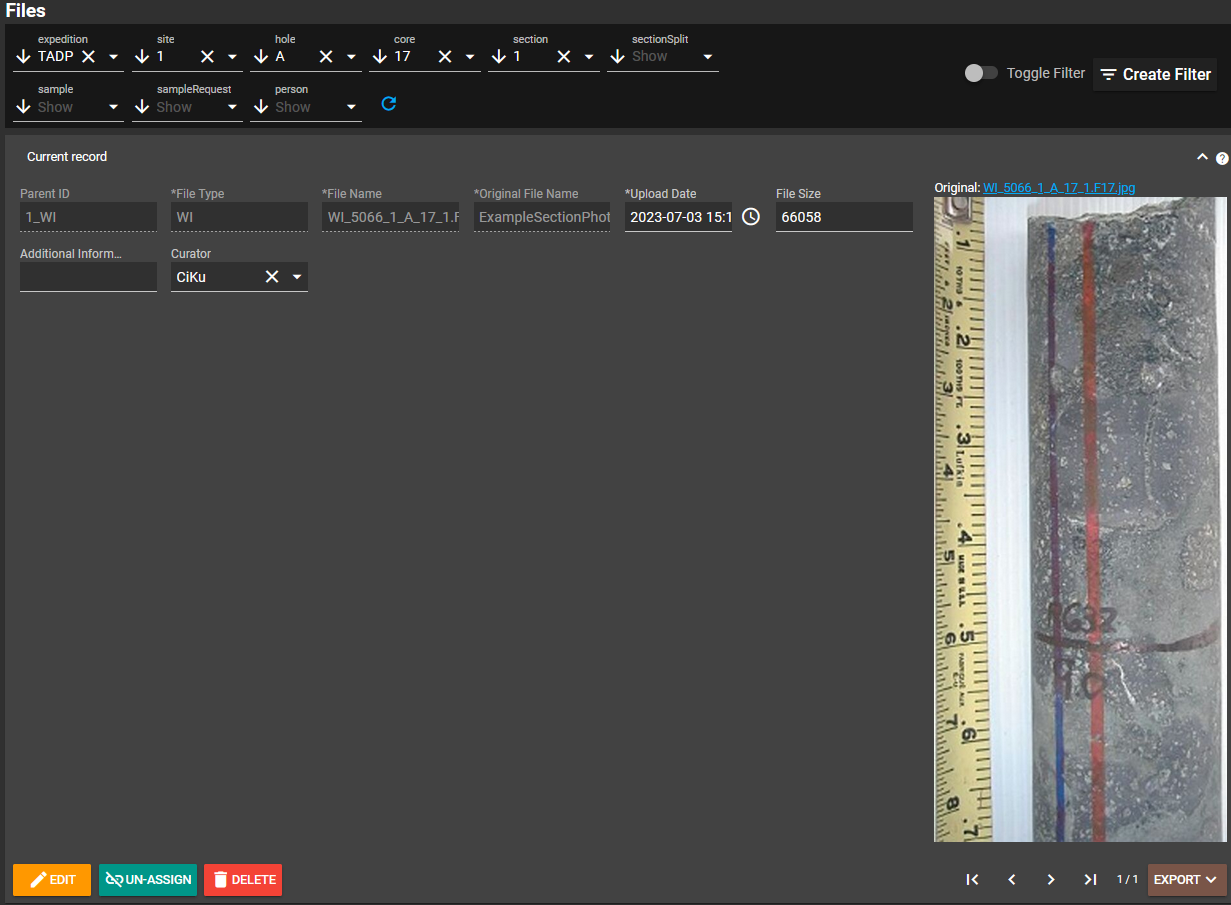
💡 Extra Info: To see other files attached to the expedition, use the filter bar at the top click “create filter”.
How can data be exported?
Data records can be exported from every hierarchy level using the brown export button -> export. In mDIS data can only be exported for one hierarchy level at a time.
- Export full records as csv: metadata header is included. The column names match the database names. Use this if you want to import the data again.
- Export records as csv: No metadata is included. The column names match the displayed names in the form.
💡 Extra Info: Every hierarchy level offers different reports and export options, which are available by clicking the export button.
How is a new curator/person added to the system?
- Open the sidebar->contact->organisation. Check if the organisation of the new person is already entered. If not, enter the new organisation.
- Open the sidebar->contact->person. Enter the person details and chose the organisation. The person acronym usually consists of the first two letters of the first name and the first two letters of the last name. If an acronym should already exist, chose a similar one. Don’t enter duplicate acronyms! Check for acronym either with "Create Filter", or click on the acronym column in "list of records". This will sort all records alphabetically.
Where are new Sample Requests entered?
Usually a user is not allowed to do that. Only in case the PI team decides to add a new type of sampling to the onsite workflow, a new request may be added. When some sampling changes or is added in preparation for the second site, let’s do a short meeting to get everything set up. Find the sample request form in the sidebar in the “curation” tableset.
A few things that could make life easier
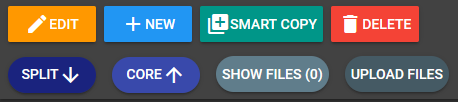
Compact User Interface and light coloured mDIS
If mDIS is used on a small screen, try the compact User Interface (UI). At the lower right corner of mDIS, click on the two arrows.

All forms will be displayed a bit more compact. The header in the form as “section details”, etc. are omitted and also the empty space in the list of records is reduced. Click the button again to disable the compact UI.
Is mDIS only available in a dark colored theme?
There is also a light colored version of mDIS. Access is possible by clicking on the raindrop.

Navigation in form via keyboard
Data entry is also possible keyboard input only. For example, to move between fields use the tab key.
Furthermore, the following key shortcuts are defined:

Rearrange columns in list of records
Do so by drag and drop.
Sort data in list of records
Sort the data in the list of records ascending or descending by clicking on the column name.
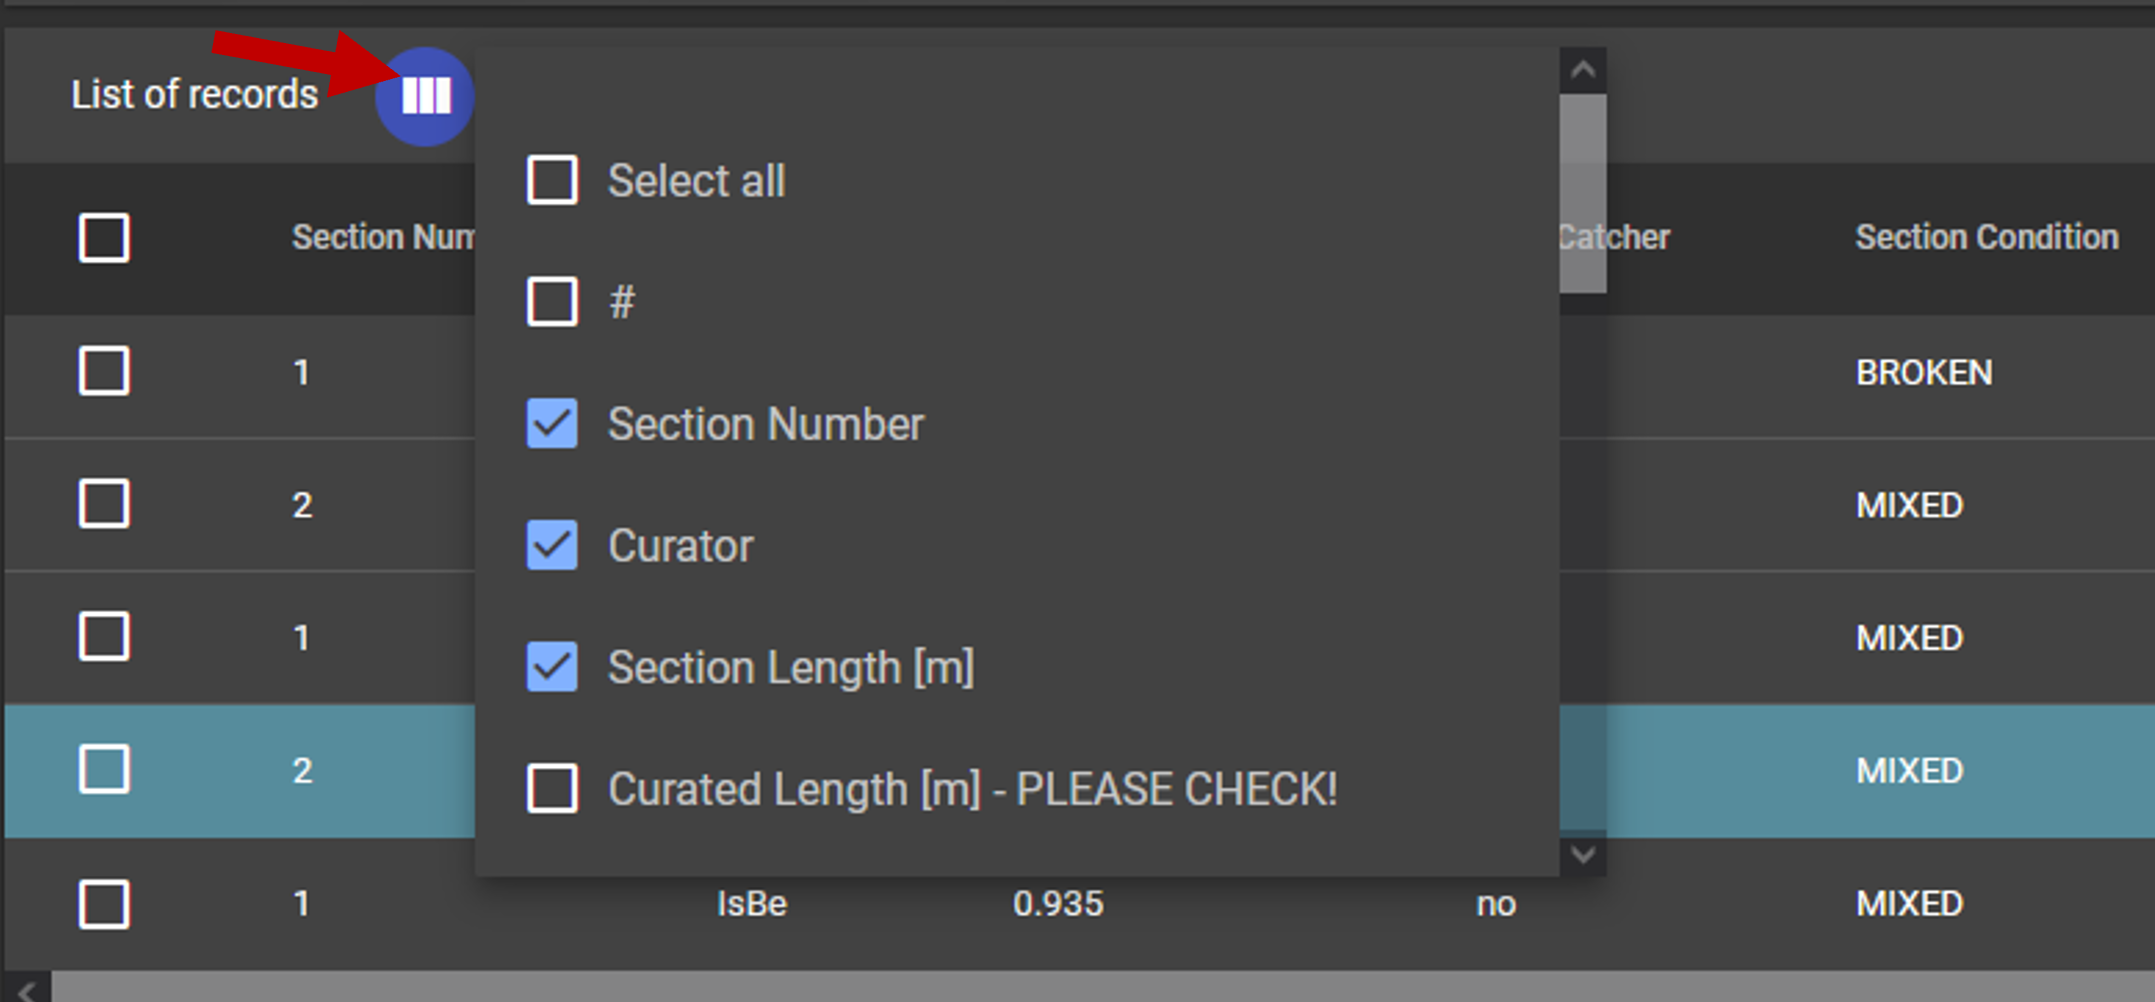
(De)select columns to be displayed in list of records
In "list of records" click on the round icon with the 3 bars and select/deselect the columns to be displayed.
Mark the most used forms as favorite
To easily access the frequently used forms, mark them as favorites by clicking on the star next to the form name. The favorite forms are shown at the top. Remove a favorite by unchecking the star. The favorite forms are saved in your user profile.
Part 2: For the More Advanced User
How to start mDIS (offline version)?
Look for these two icons on the windows desktop:
Double click the Oracle VM VirtualBox. The Virtual Box Manager will open.
- Locate the virtual box and if it says “powered off”
- click “Start”
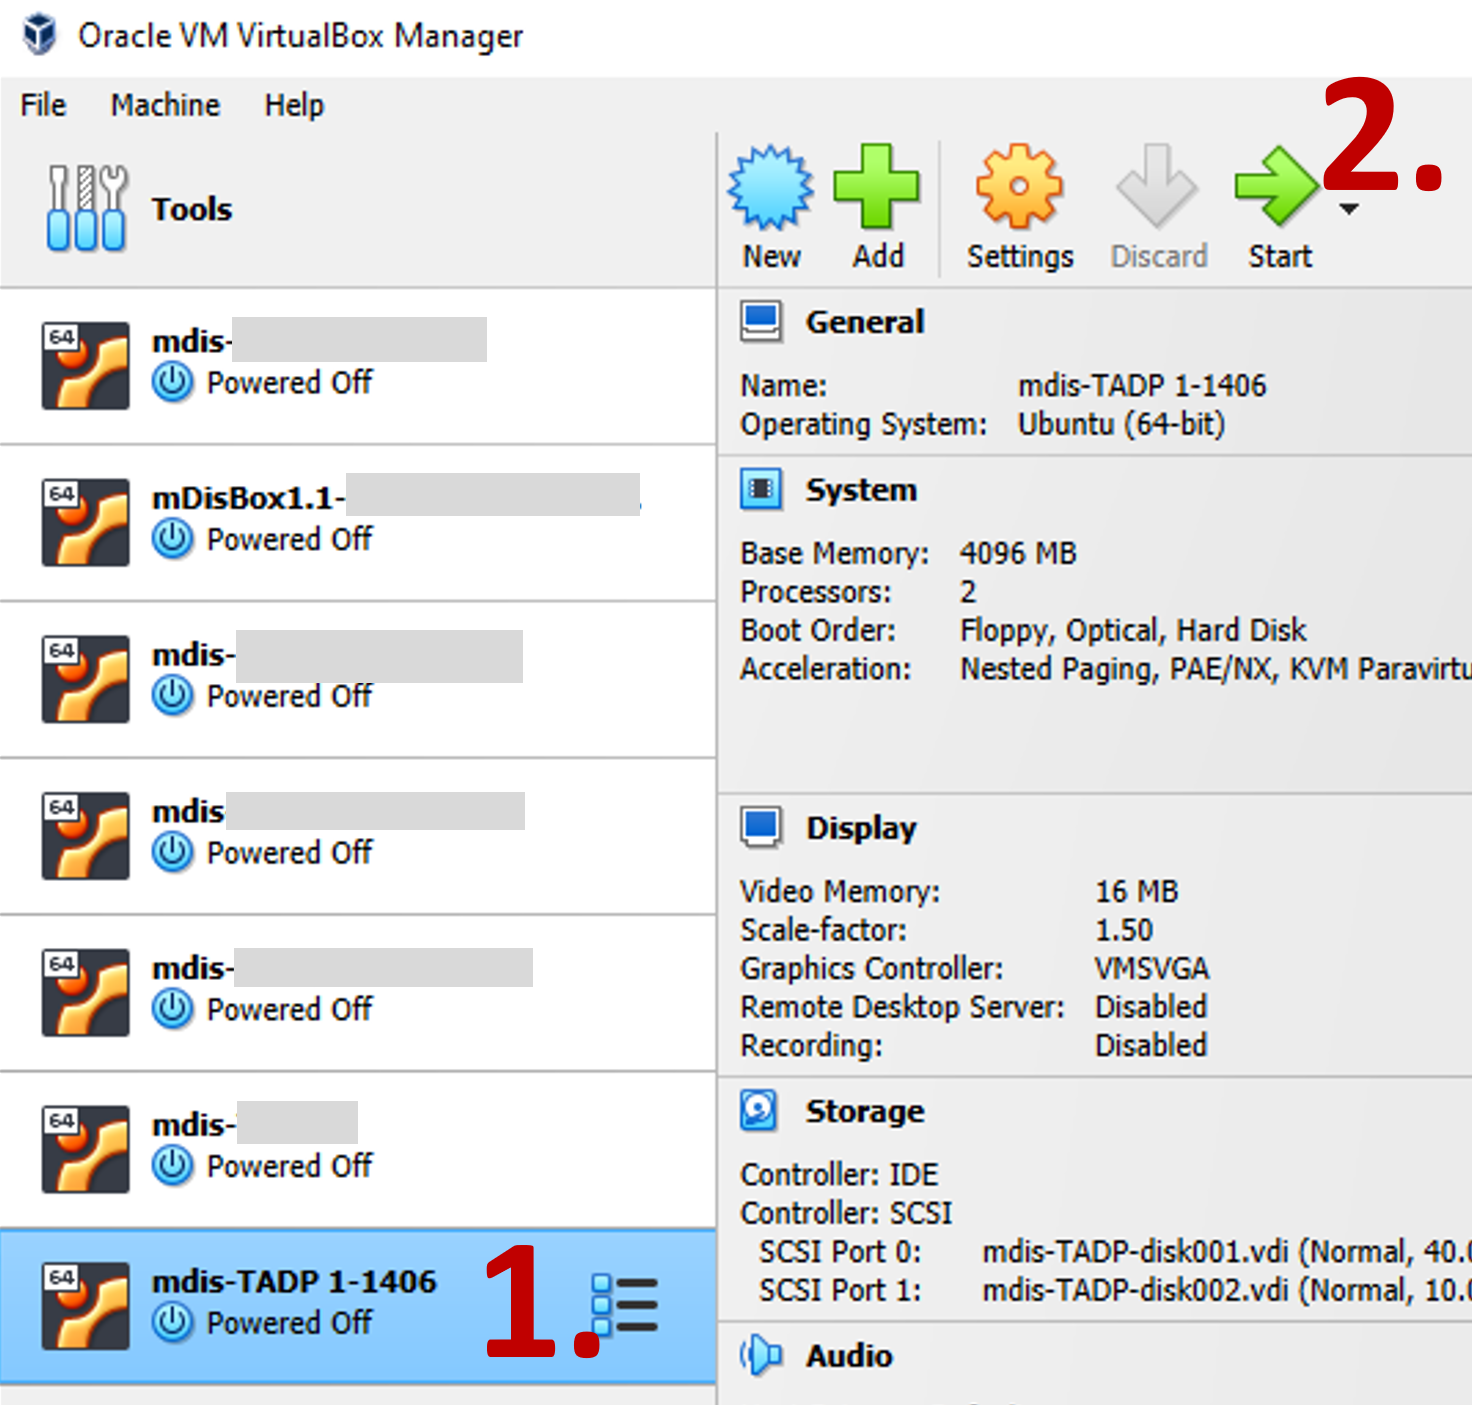
Now the virtual machine, the PC in the PC, will boot. Wait until the login screen appears. Choose user “vagrant” and type the password. Press enter. Now minimize the virtual box.
To access mDIS open a browser on your host desktop. The login mDIS page should appear. If not, press the “offline mdis” button on the bookmarks bar of the browser or enter http://localhost:8888/ manually.
💡 Extra Info: If the virtual machine screen remains black after login, click on the “resize” icon in the upper right corner of the screen. After 1 or 2 seconds the desktop should be visible. Then “resize” it again to full screen.

How to turn off mDIS?
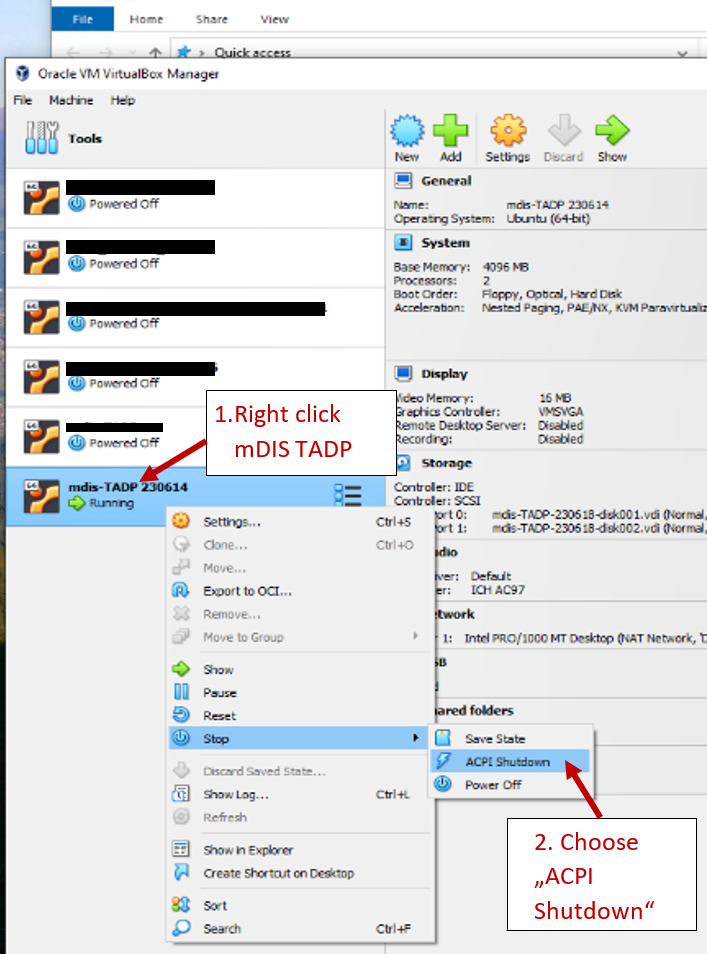
Log out of mDIS in the browser. Then, click on the virtual box icon (Oracle VM VirtualBox) in the windows taskbar. The virtual box manager will open. There right click on mDIS TADP -> Stop -> ACPI Shutdown. Don’t use “Power Off”. That would be the equivalent of pulling the plug out of the socket.
Where are backups stored (offline version)?
Backups of the database are done automatically daily at 3 PM local time.
💡 Extra Info: There are no files and images saved in this backups!
- Open the Upload folder in Windows and click on backup -> mysql
- All database backups are available here as .zip file.

How can a complete system backup be made (.ova-file)?
To make a backup of the complete mDIS system (virtual machine), turn off mDIS and click on the virtual box icon (Oracle VM VirtualBox) in the windows taskbar. The virtual box manager will open.
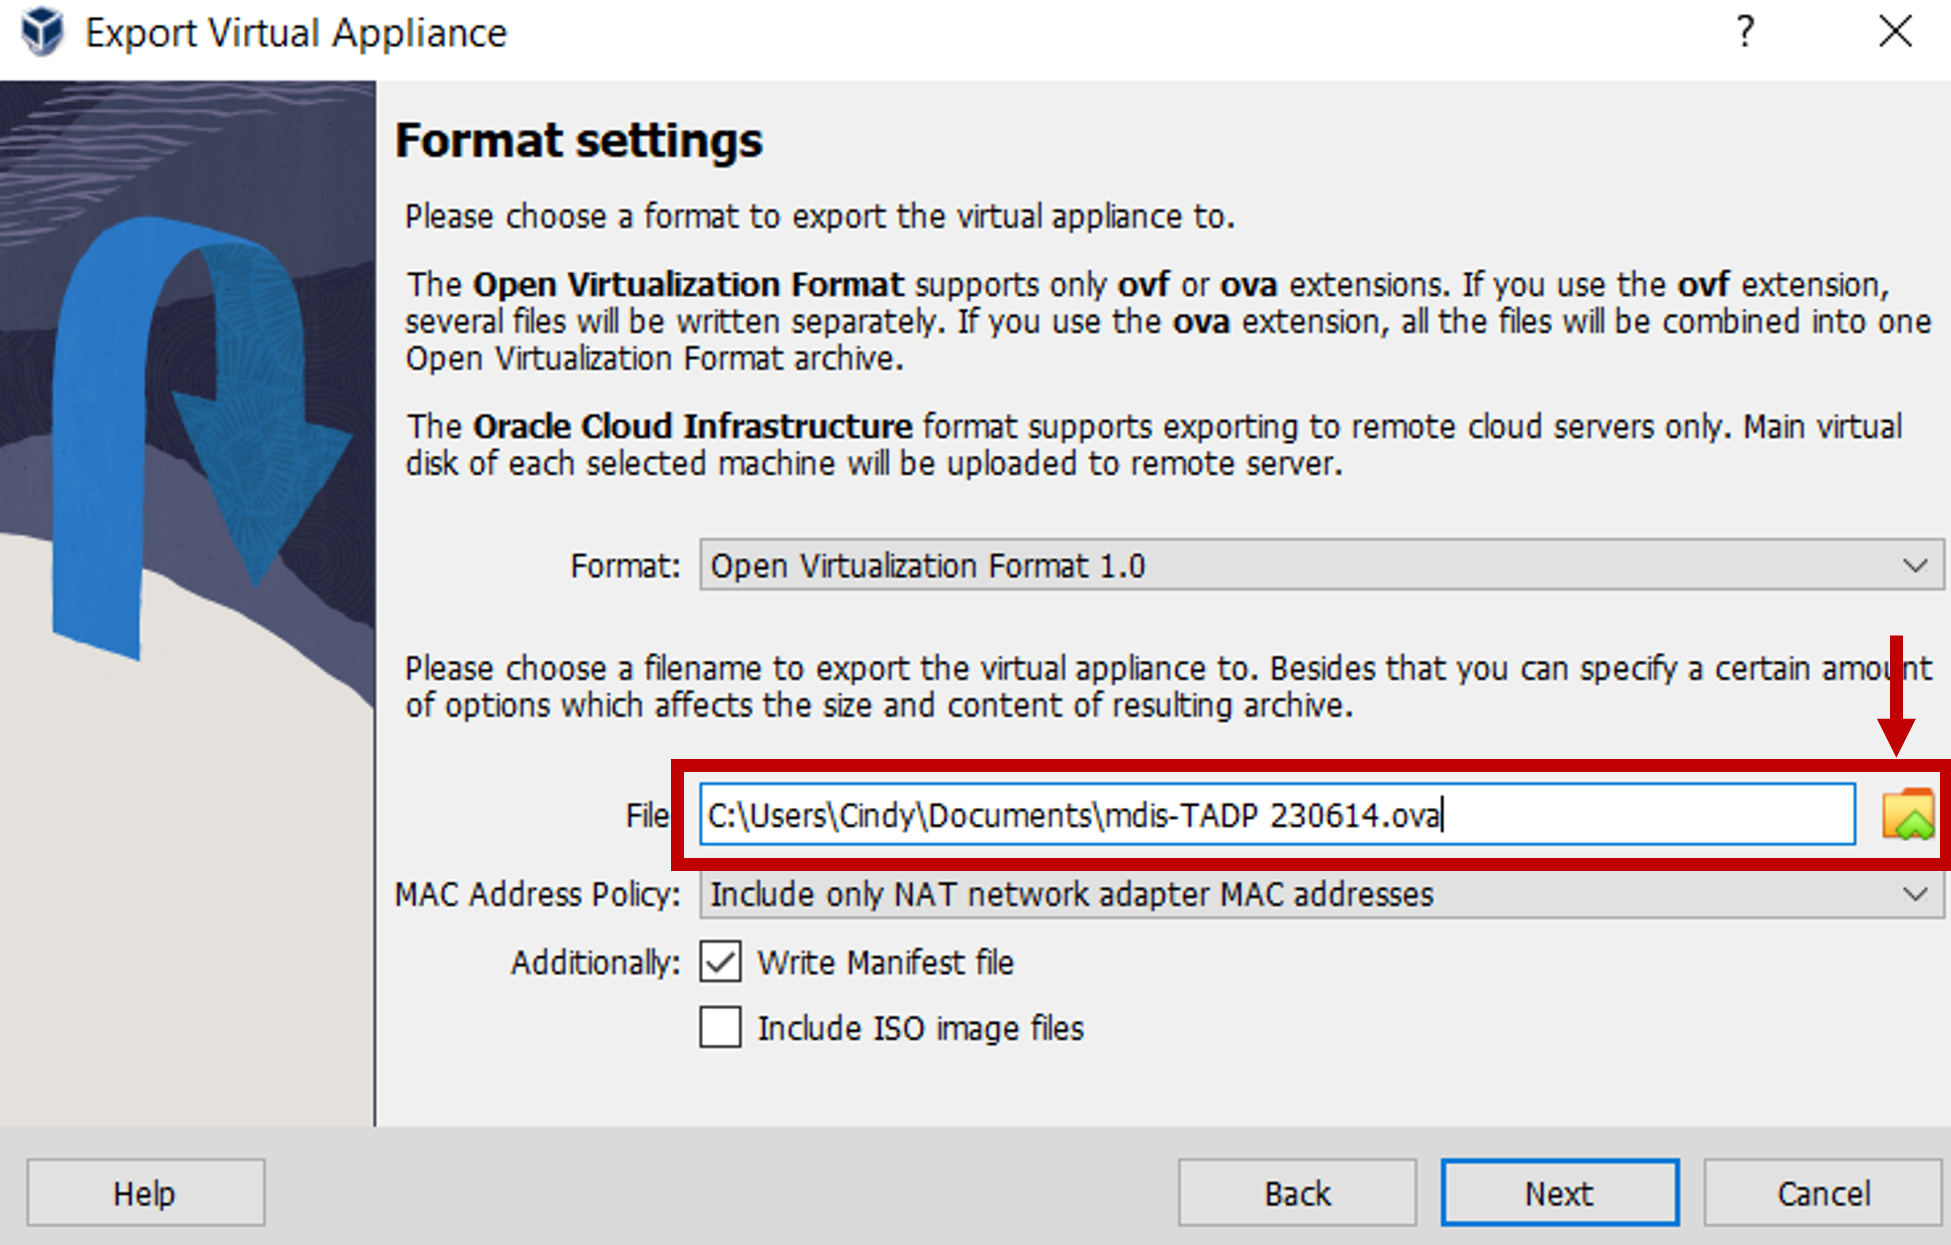
Select the correct mDIS instance by clicking once (1.). Then go to “File” in the upper left corner on the manager and click on “Export Appliance” (2.). A new window will open. Click “next”.
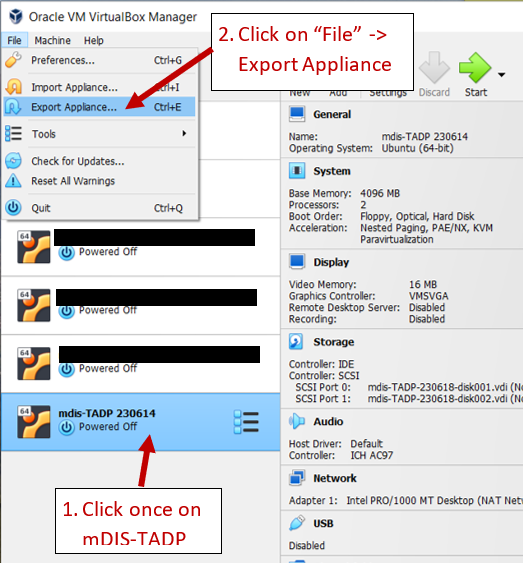
On the following dialog select the location to store the file. To choose another location click on the folder icon. After that click “next”. On the last dialog just press “finish”. Than wait for several (5-10) minutes to finish the export. When that is done save the .ova-file on an external hard drive and/or upload it to a cloud.
How is a new mDIS Instance imported (.ova-file) and when should that be done?
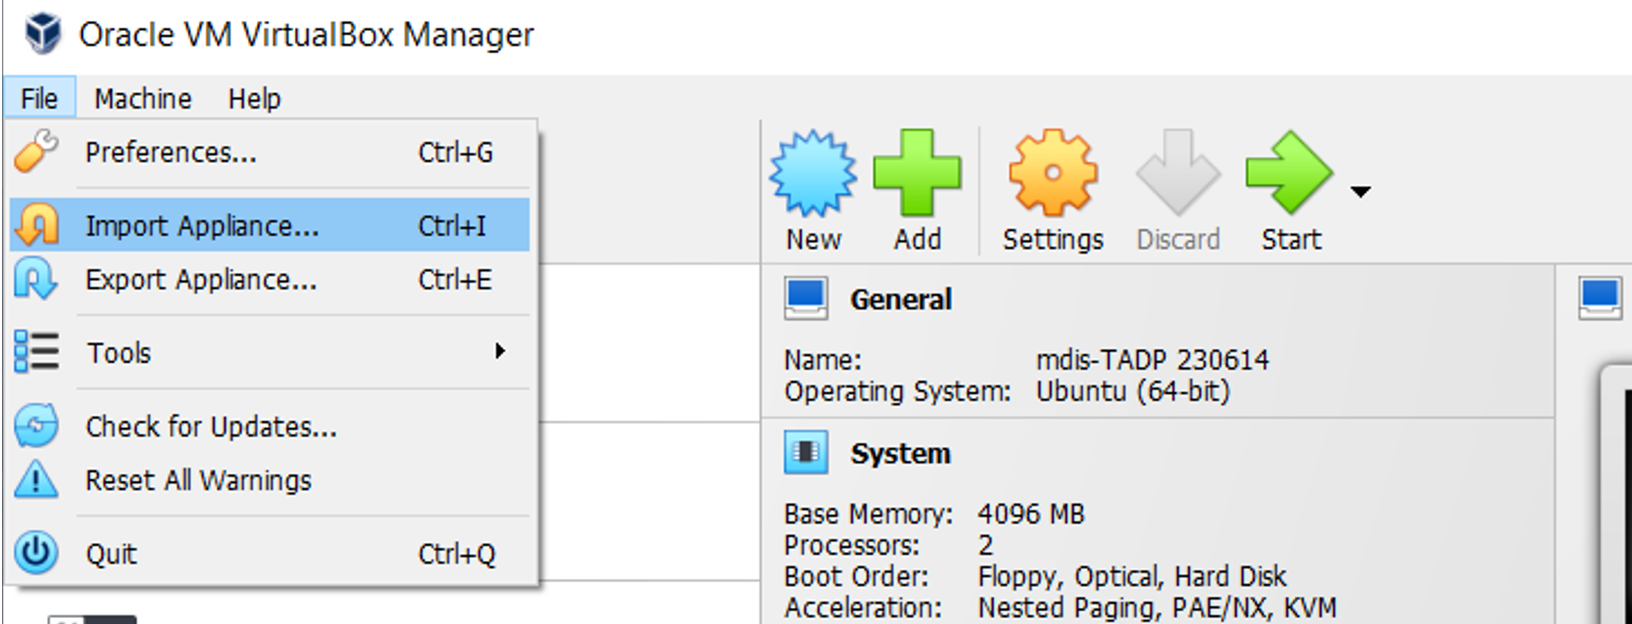
First, turn off mDIS and click on the virtual box icon (Oracle VM VirtualBox) in the windows taskbar. In the virtual box manager click on “file” in the upper left corner, then -> Import Appliance.
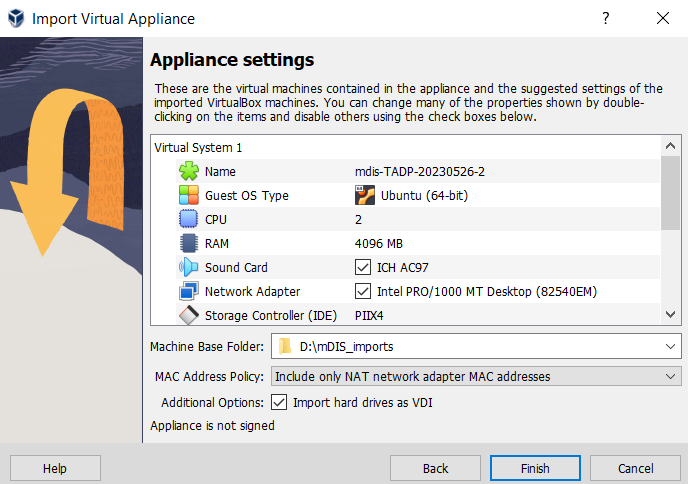
A new window will open. Choose the location where the file is stored by clicking on the folder icon. Then click “next”. In the next window choose where to store the Machine Base Folder. Usually, it is not necessary to change anything. Press finish and wait for the import to complete.
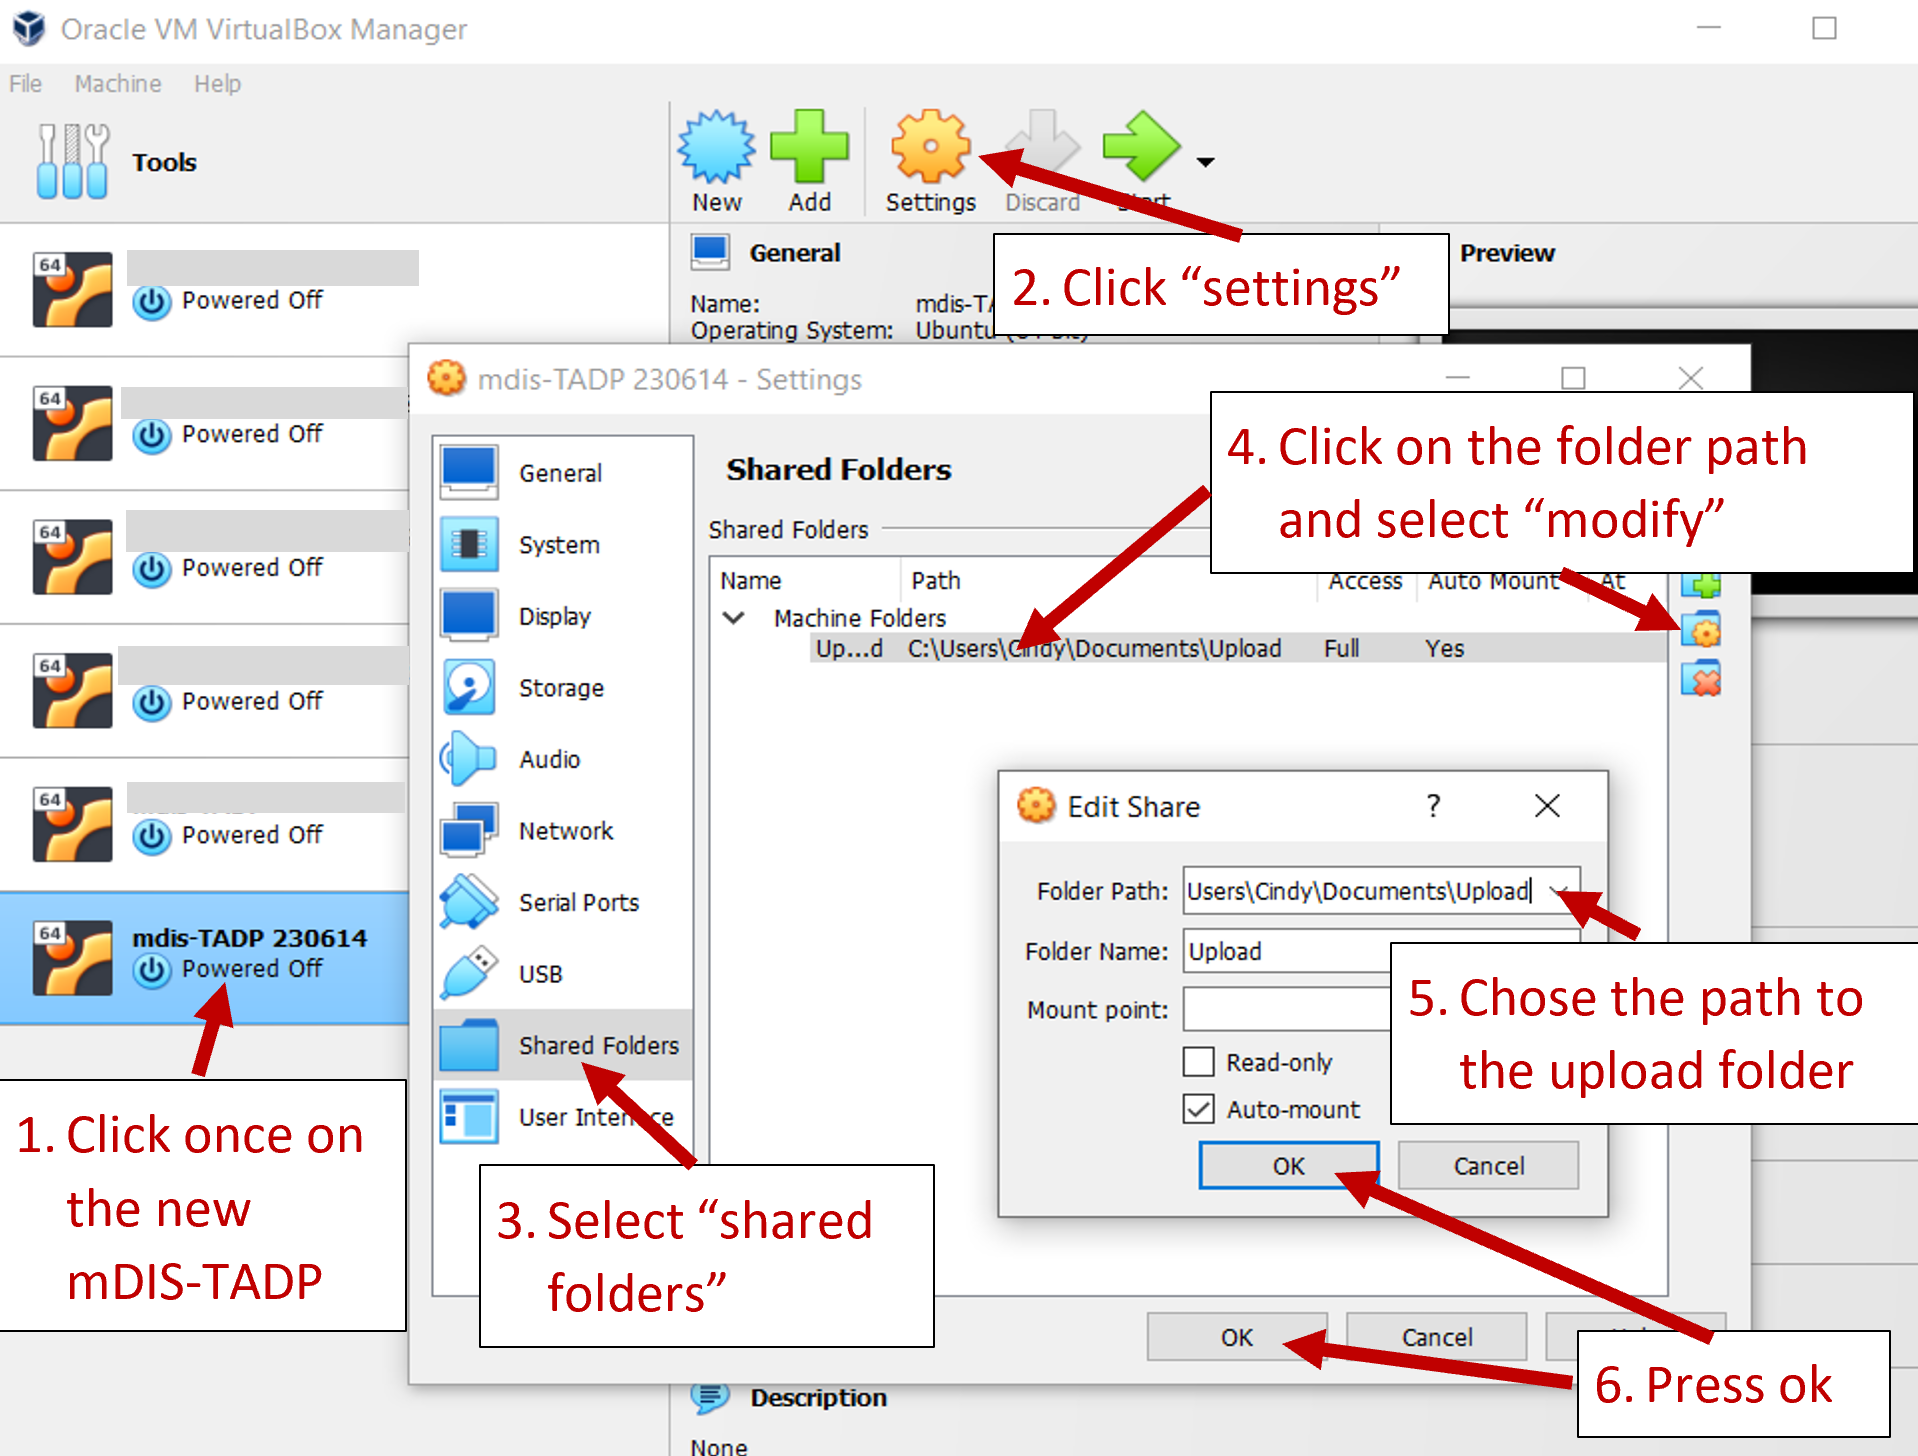
Before using the newly imported mDIS make sure that the location of the uploads folder is correct. Click on the new mDIS instance and choose “settings” (1. and 2.). Click on “shared folder” (3.) and choose the location of the upload folder, if necessary (4. and 5.). Then press OK (6.).
Then, start mDIS.
What to do if mDIS freezes?
Click on the virtual box icon (Oracle VM VirtualBox) in the windows taskbar. The virtual box manager will open.
- try to just turn it off. Right click on mDIS Instance -> Stop -> ACPI Shutdown
- if that does not work choose “Power Off”
- if that does not help restart Windows
Why is access to mDIS via the host PC (Windows) browser not possible anymore?
Make sure the virtual box is running! Open the virtual box manager and have a look if mDIS is running. If it is running, the problem could be that the IP address of you guest system has changed.
In that case open the Virtual Box in the windows taskbar. The Guest PC (Ubuntu System with mDIS) will open in a separate window. On the lower right corner of the Ubuntu Desktop are several icons.
- Hover over the network symbol with your mouse.
- An overlay with the IP address becomes visible. Write it down.

- Open the virtual box manager. Click on File -> Tools -> Network Manager. Click on the tab “NAT Network” and choose “Port Forwarding”.
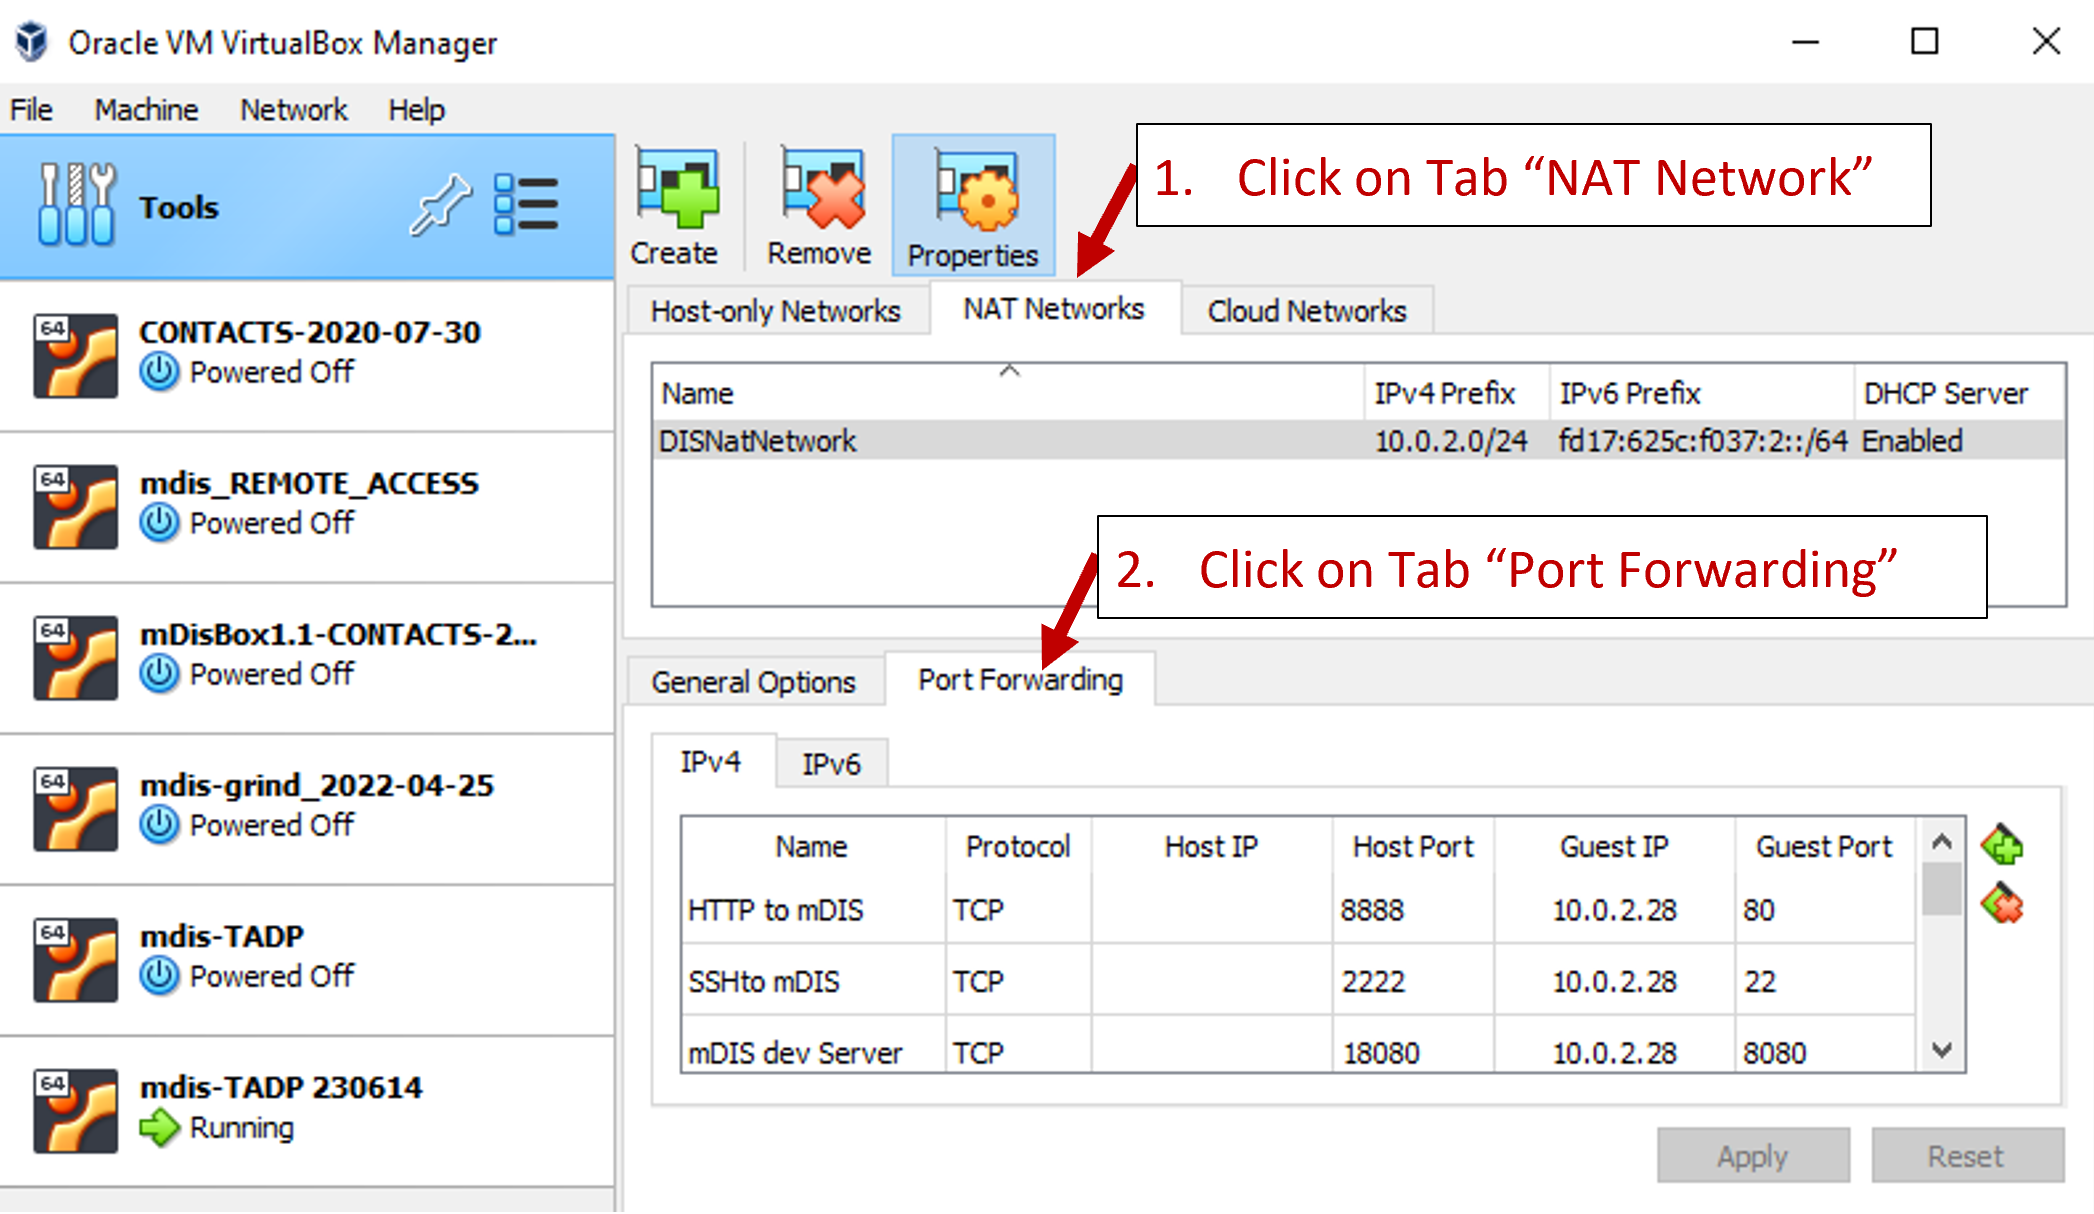
Have a look at the Guest IP. Is that the same as on the Ubuntu Desktop? If not, change the Guest IP by double clicking the IP address under Port Forwarding. Change the Guest IP for every entry. Usually only the last 2 digits change.
If that does not solve the problem contact the system administrator or the ICDP data management.
How to create a new login account?
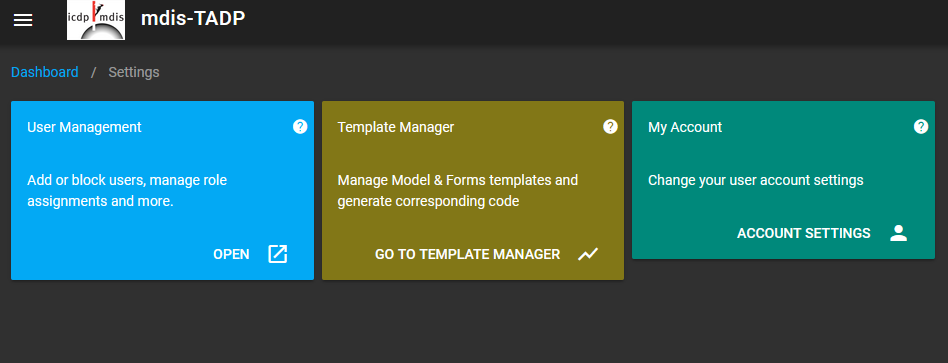
Open the sidebar and click "settings". Only with system administrator rights the blue box with user management will be available. Otherwise the screen is empty or only shows the template manager. Click “open” on User Management.
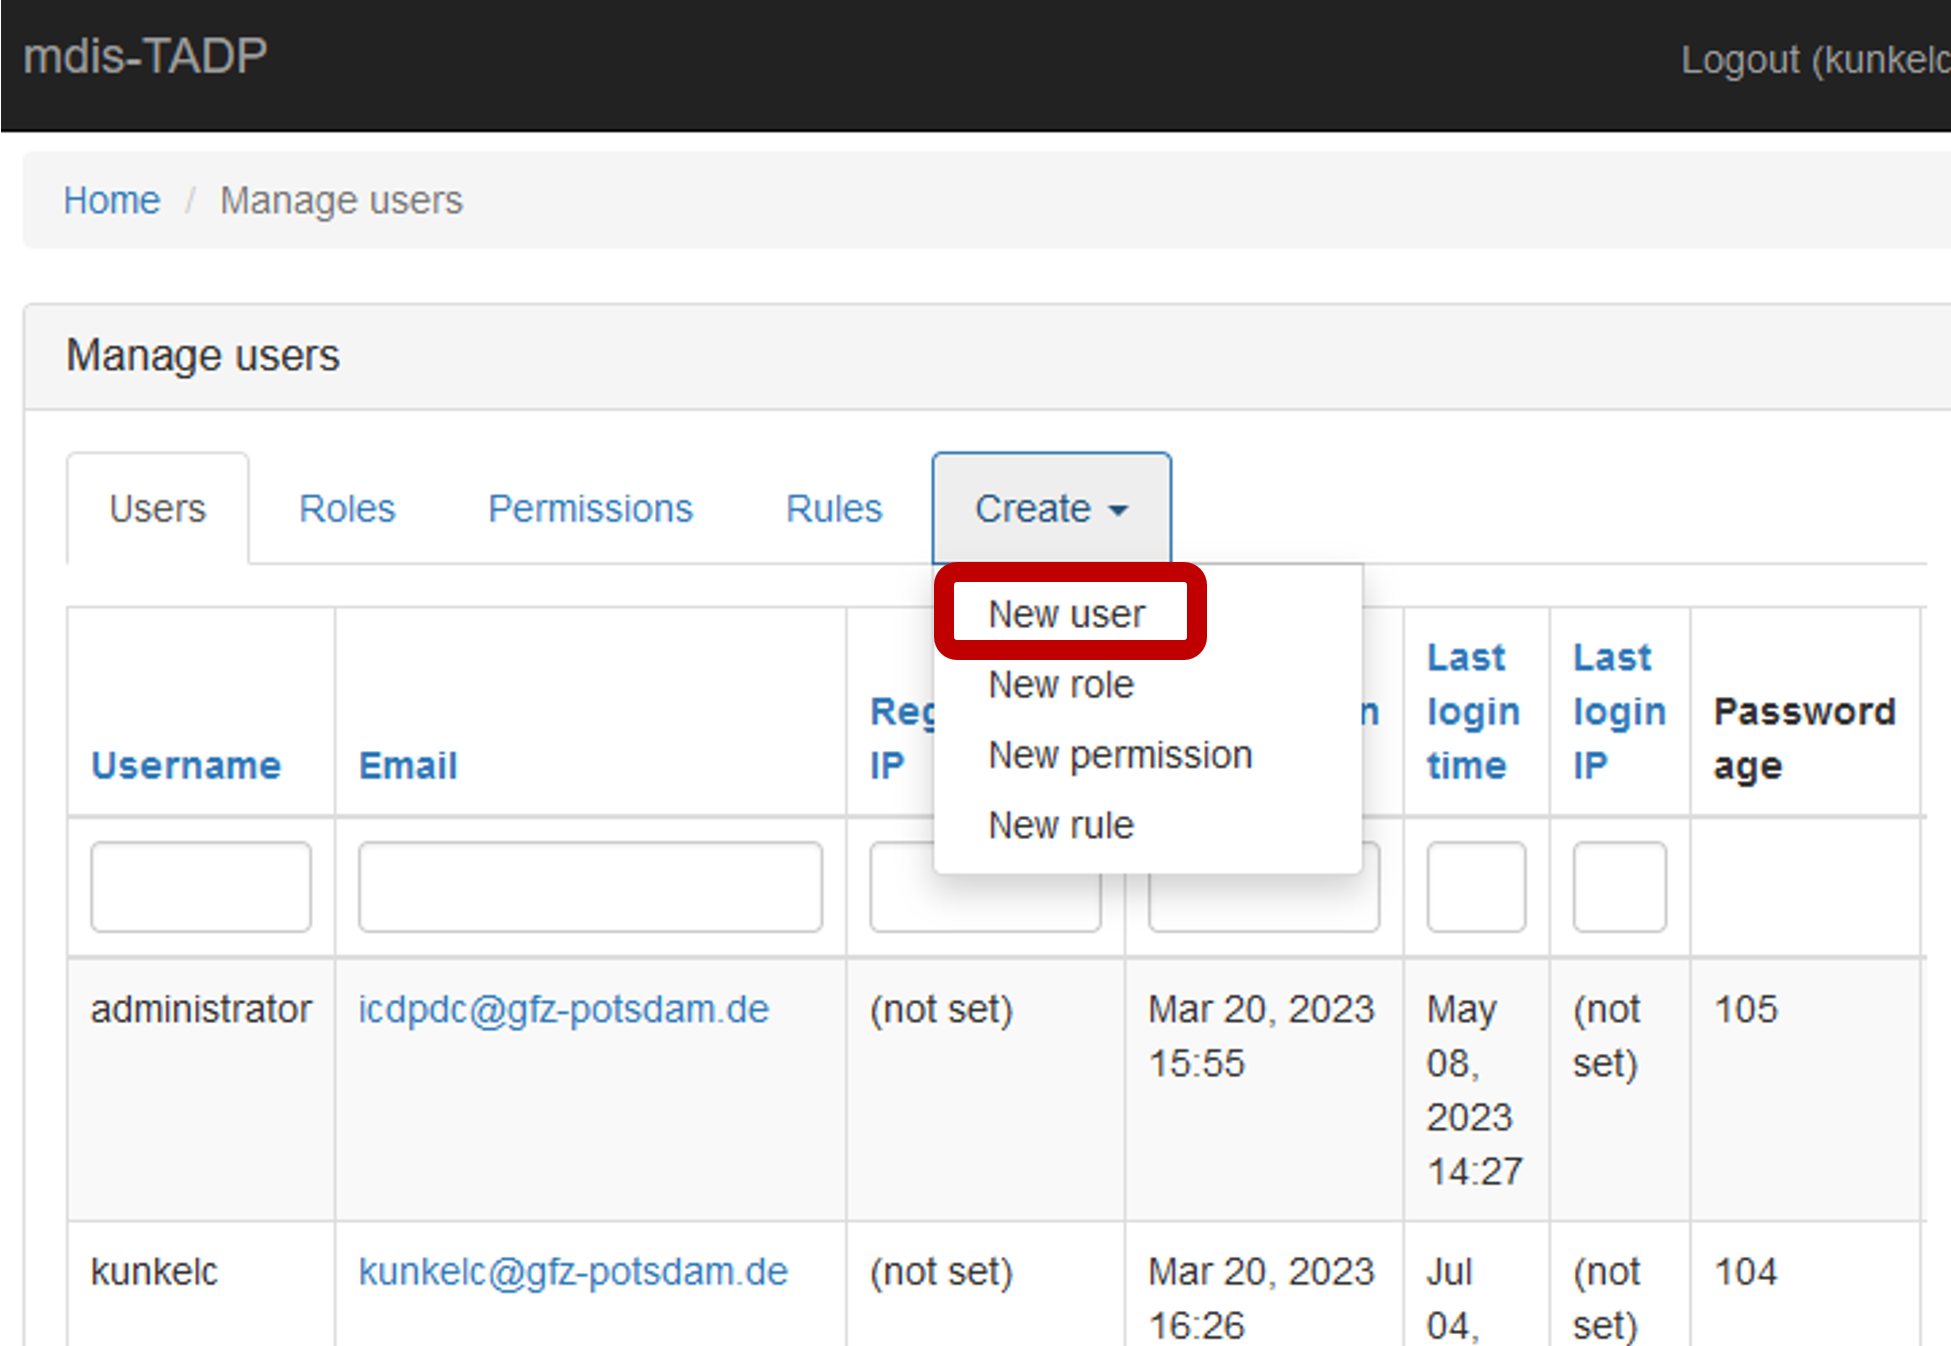
The new window shows all users of this mDIS instance. Go to the tab create -> new user.
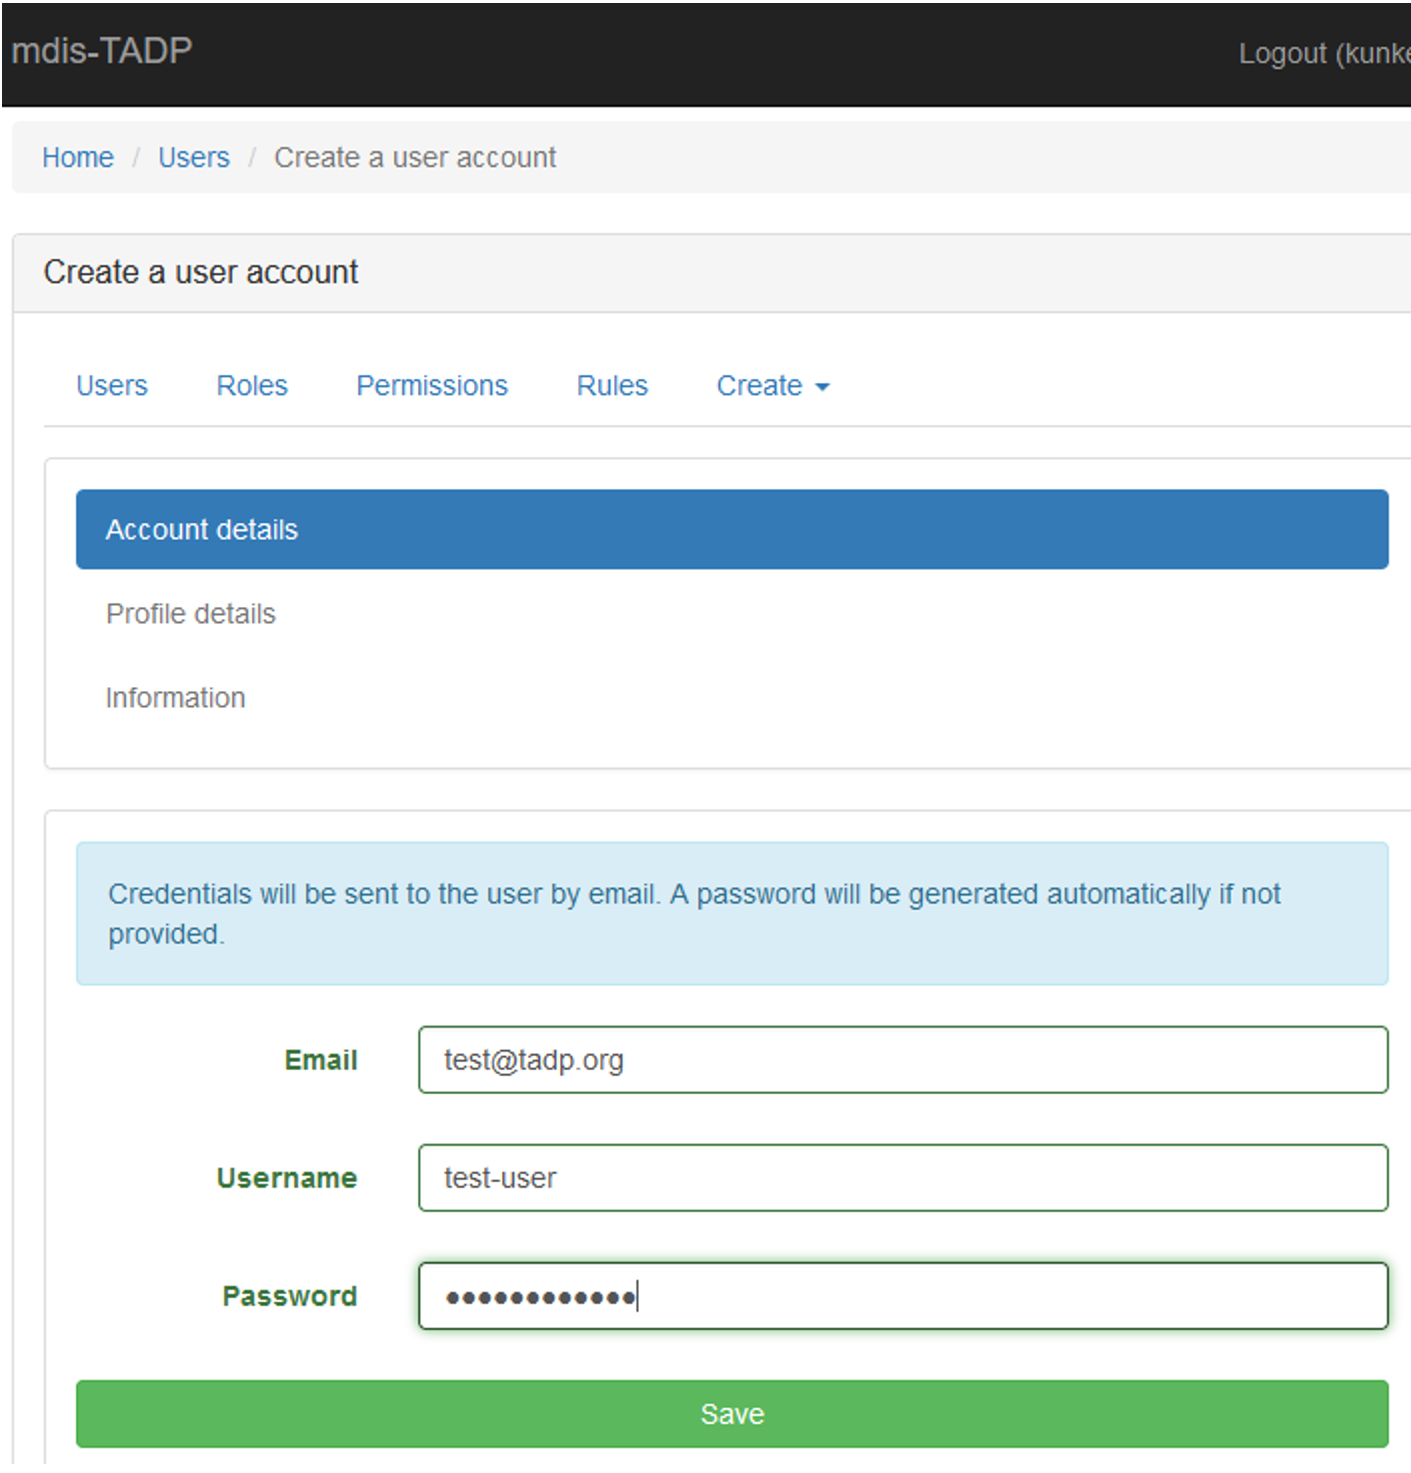
Type in all necessary information in the following screen and press “save”. In the TADP offline version the credentials will not be sent by email. Please make sure to remember the password.
After saving click on “assignments”, chose a user role and click “update assignments”.
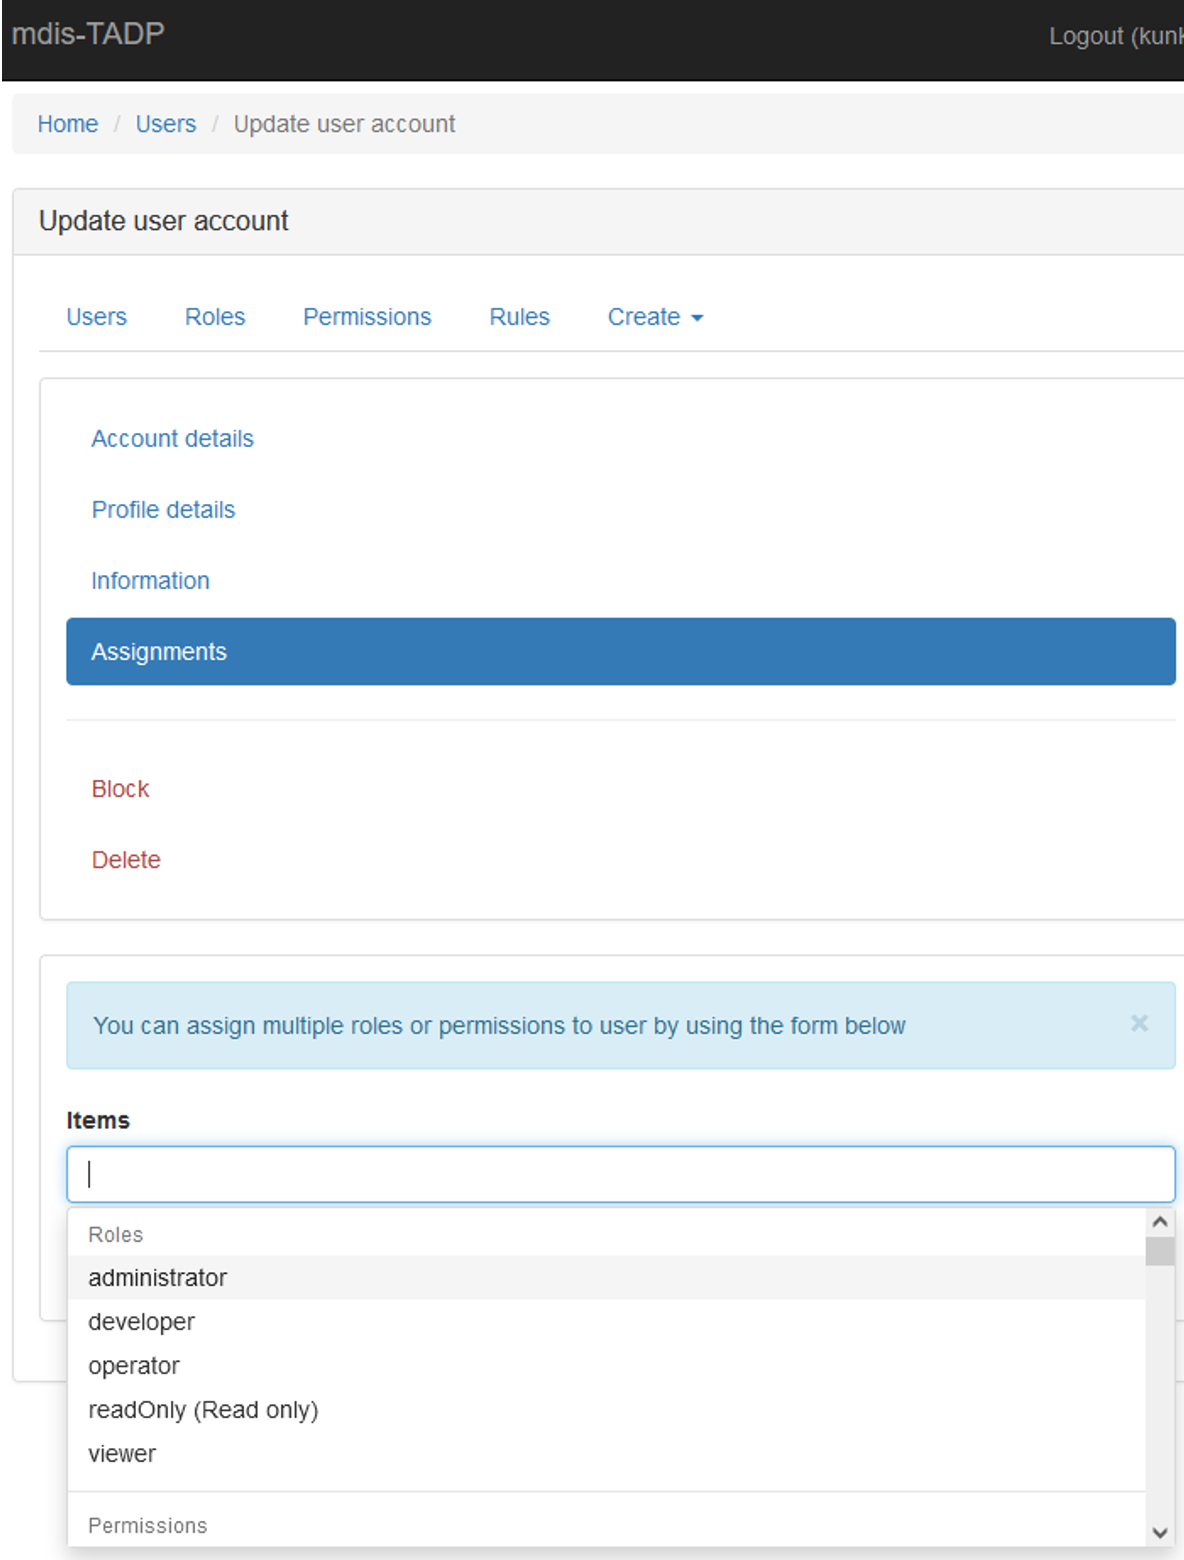
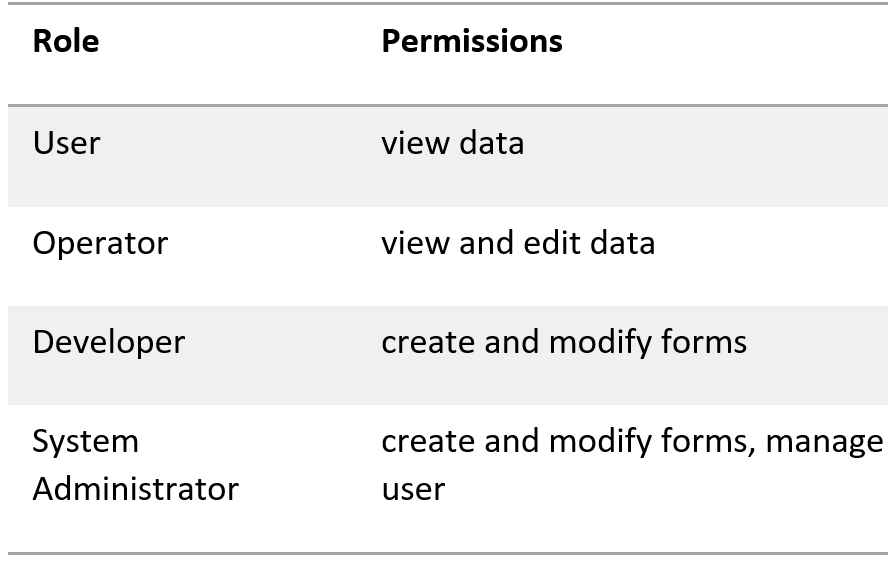
💡 **Extra Info:**mDIS has 4 default user roles. Only a system administrator can add new login accounts to mDIS. An every day user would be assigned an operator role.
Where to check if the core recovery equals the sum of the section lengths?
In the core form click “export” at the bottom of the page. Choose tab “reports” -> cores with sections. It is possible to copy and paste the data from the browser window directly into Excel or Calc.
How to change the local time in the virtual box?
to be continued.