
Template manager
Template manager
Abstract
The mDIS Template Manager is a visual tool to create and manage mDIS data entry forms and data models, as explained below.
The Template Manager consists of a set of webpages. These are accessible only to mDIS administrators, who should have some knowledge about relational data modeling.
Related Pages
Developer page
mDIS PHP Class hierarchy in the backend/models directory
Wording
In mDIS terminology, a template is a specification of a data model or a form.
Templates are used to generate a data model (the PHP files and a corresponding database table) and data-entry forms.
The templates in mDIS are stored in JSON files. This is a simple text format. This format is human-readable and editable; the JSON syntax can be validated easily, and the template source code can be put under version control.
The term model or data model is used in the sense of the "Model-View-Controller" software design idiom. "Model" describes the application's dynamic data structure. Independent from the user interface, the Model directly manages the data, logic, and rules of the mDIS application. The Model accesses database tables to read and write records.
"Model" does not mean "Entity Relationship Model" (or a related concept) here, and it does not mean something scientific such as (geochronologic) "Age Model", (statistical) "Linear Regression Model", or physical 3-D model or prototype.
"Forms" represent the "View" part of the "Model-View-Controller" design pattern. A data-entry form implements the user interface for a model. Multiple forms can be created on the basis of a single model template.
General Usage
A data Model Template needs to be generated first. mDIS Admins do this via the Graphical User Interface (GUI) of the Template Manager. The model template specifies how mDIS generates PHP code, JavaScript code, and JSON code.
Then, one or more Form Templates can be generated afterwards, based on a Data Model Template. Then a data entry form is usually generated.
The GUI
Using the Template Manager, the mDIS sysadmins and developers can create, update, and delete both data model templates and form templates.
If users have sufficient rights, they can access the Template Manager from the settings page.

Main Page of the Template Manager
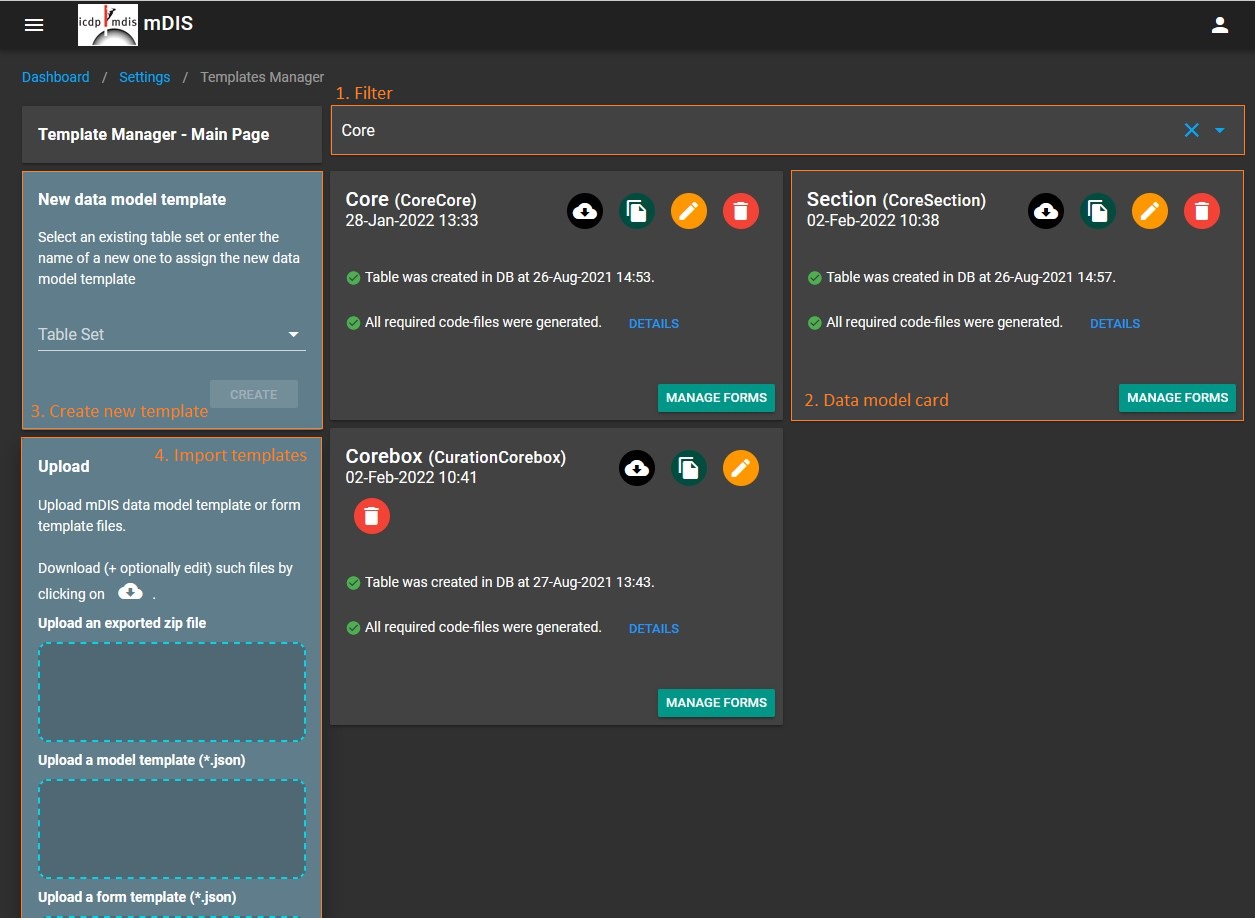
Filter: The value of this field is used to filter sets of data model templates. Items in the selection box are called "table sets".
Alternatively, any free-text input can be entered at (1), as a search expression.
mDIS will try to match it to all fully qualified names of the data model templates. Search results will be displayed in a dropdown list, showing the names of tablesets found.Thus, you can filter by tableset or by tablename.
Data model card: Below the filter field, the existing data model templates are displayed as cards.
Each card has the following content:- The full name of the data model template consisting of the table set and the model name
- The date when the data model template was last saved
- The status if the database table exists
- The status if all required files exist
- Buttons to:
- Download the data model template files
- Duplicate the data model template
- Edit the data model template
- Delete the data model template
- Manage the forms for this data model template
Create new template:
- Select the table set you want to assign the new data model template to; or enter a new table set name.
- Click on the button "Create" to open a page to edit the new data model template.
- Continue with: Edit the new data model template.
Import templates
- Uploading
*.jsonfiles with table- and form-definitions into mDIS. Advanced topic, for experienced users only.
- Uploading
In Case of Errors and Warnings
If you have just tried to create new models or imported files, and there were errors or warnings displayed:
Check file- and directory permissions on your server. The mDIS template manager performs code generation and needs to write to some directories.
Read the File Permissions section for more information.
Editing a data model template
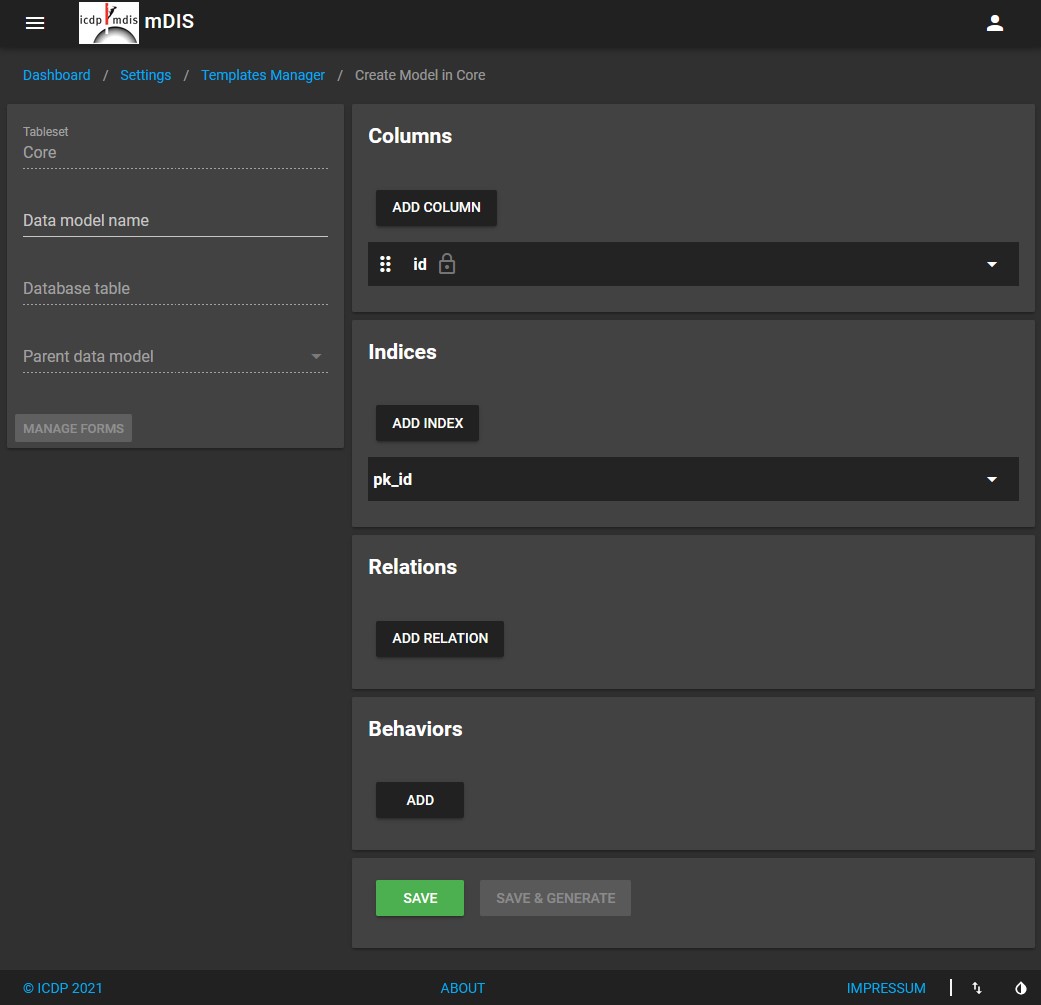
In the screenshot above, in the pane on the left, see the
Data model namein the associated text field.- When creating a new data model template you must assign a model name.
- The model name must be written in Camel Case, e.g.
CorePieces. - Enter "Core", for example. See data model templates structure for more info.
- Attention:
- mDIS then generates the fully qualified name of the new database table. To do so, mDIS uses the tableset name selected earlier and the name of the model you just entered. This rule cannot be altered.
- Accordingly, the tableset names cannot be changed any more after table assignment.
- Thus, please invest some thinking into your naming scheme for new tablesets.
In the "Columns" tile in the main panel, columns can be added, modified, or deleted.
- A column
idhas already been added for you, since it is required in all tables, as a Primary Key (pk) column. - If you selected a parent data model, a column for the id of the parent model has already been added, see 7. below.
- A column
In the "Indices" pane, indices can be added, modified, or deleted.
- An index for the
idcolumn has already been added for you since it is required in all tables. - If you selected a parent model, an index for the id of the parent model has already been added.
- An index for the
In the "Relations" pane, 1:n or n:m relations to other tables can be added, modified, or deleted.
- If you selected a Parent data model in the left pane, a relation to that model has already been added.
In the "Behaviors" pane, you can attach behaviors to a model. Behaviors can modify the way a model or some of its columns behave.
Click the button "Save", or (if enabled) "Save & Generate", to save the template JSON file and to generate the output files.
Optionally, you can select a Parent data model from the list of existing models. See left pane.
- If you select a parent model, a column that contains the
idof the parent model, an index on this column, and a relation to the parent model is automatically created.
- If you select a parent model, a column that contains the
Manage form templates of a data model
Locate the card of the data model template on the main page of the Template Manager. Click on "Manage Forms" to open the list of form templates for this data model template.
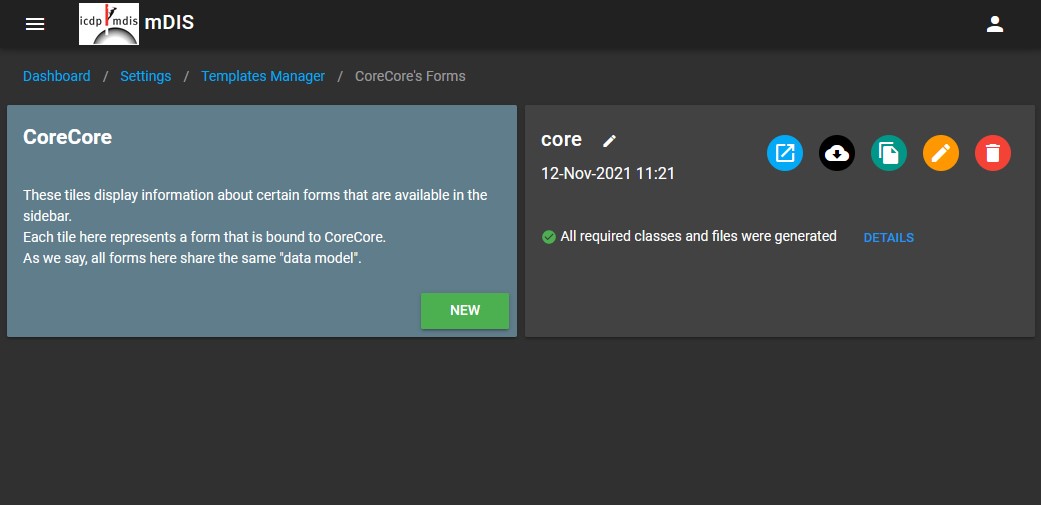
On most mDIS instances, there is only one form template for each data model template.
Each form template card contains:
- The name of the form template, as will appear in the sidebar of the mDIS frontend GUI.
- The date when the form template was last saved
- The status if all required files exist (code-generated files)
- Buttons to:
- Open the form
- Download the form template files
- Duplicate the form template
- Edit the form template
- Delete the form template
Click on the button "New" on the left pane to create a new form. Now edit the new form template
Editing a form template
A form template consists of fields the user can use to view or edit data. See figure below for an example.
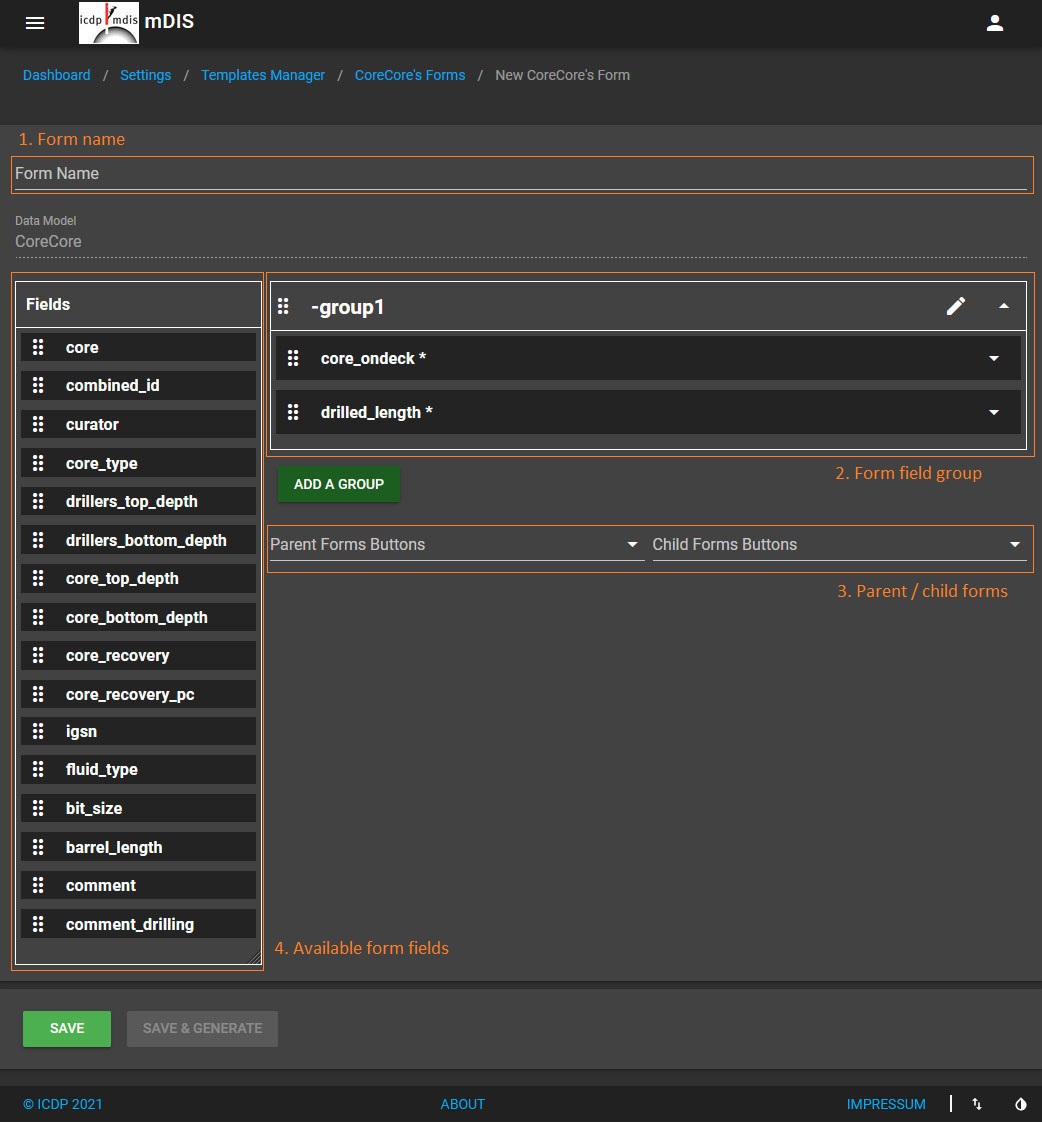
The Form Definition Editor
Sidebar "Fields": Available column names
Main Panel: Column names mapped to form elements such as text fields, selection boxes, etc.
The fields can be grouped into horizontally separated blocks. Each group can have a name.
Details of the figure above:
At the top margin, you can see the
Form Nameof the form, how it will appear in the sidebar of the mDIS frontend.- When creating a new form template, you have to assign a name.
- The form name must be written in kebab case, e.g.
corebox-short. - The name of the data model will not be automatically added to the form name. Unlike the model editor mentioned above.
- The data model has been selected before and cannot be changed here.
In the main panel, see a list of form field groups, here: "-group1".
- When creating a new form, there is a default group containing all the fields that have been marked as required in the data model template. These required fields cannot be unselected but can be edited and moved into a different field group.
- If the name of a field group starts with a dash
-, the name will not be displayed in the front end. The field group will not have a title to save screen space. - You can change the name of a group by clicking on the pencil icon (✏) on the right of the field group name.
- To add a field group, click on the button "Add a group" and enter a name.
- To remove a field group, just drag all fields out of it. When the form template is saved, the group is removed.
- You can collapse or expand a field group by clicking the up/down arrow at the right of the field group header.
- If you have more than one group, you can change their order by dragging them up or down. Click and hold the drag handle (
:::) to the left of the group name.
In the main panel, below the form field groups, you can select the linked parent and child forms.
- The parent and child hierarchy is determined by the parent relations of the models.
- You can select one or more parent and child forms. For these, links should be displayed in the form.
- The user can open the forms associated with the records currently displayed.
On the left side, see the list of available form fields.
- The list contains the columns from the data model.
- Each column can be dragged into a field group on the right side.
- Click and hold the drag handle (
:::) on the left side of any column name. - Notice that all fields labeled as "required" cannot be unselected. However, they could be moved into a different group, e.g., at the bottom of the form. Required fields have a star symbol
*next to their name. - To edit a form field, expand the column attributes by clicking on the tiny up/down arrow tips at the right margin of the field.
- A huge customization menu is displayed. Not shown here.
Click the button
Save & Generateto save the template JSON file and to generate the output files.
TODO: form fields customization dialog
Show a picture of the form field customization dialog and discuss it.
Template manager output
Saved JSON Files
The Template Manager saves a model or form as a JSON file, which is stored here:
/backend/dis_templates/models/*.json- metadata for MySQL data table definitions (data models)/backend/dis_templates/forms/*.json- metadata for input forms (Form definitions)
Both of those directories contain the possibly modified models and forms of your mDIS instance. The default models and forms from ICDP can be found in /backend/dis_templates/defaults/.
Why .json files?
Unlike legacy DIS, there are no database tables involved to store form-, table-, or tableset-metadata. All metadata is stored in .json files.
These *.json files are (pretty-printed) plain text files that can be easily understood and edited by humans. These text files can be put under version control (git). They are also useful for exchanging form definitions and table definitions between existing mDIS installations.
The JSON files can be used to be transferred from one mDIS instance to another to create the same model or form.
Templates *.json File Structure
Which template properties are available in a model's JSON definition file, or in a form's JSON definition file?
Note
Be careful when you use operating-system commands to make a file copy of a form's .json files. You could do this inside the /backend/dis_templates/forms/ directory, e.g., for experimenting. Better use the duplicate button in the Template Manager.
If you copy a JSON file into the above directory, you might have to manually edit JSON code: To avoid name conflicts, change the value of the name: element of the form's .json, and also maybe correct the name of the dataModel: in the .json file.
Now the file copy should show up in the Template Manager GUI. However, only after you "save & generate" the form, it will also show up in the sidebar of forms in the mDIS frontend.
Better store the copy of unneeded .json files outside of the /backend/dis_templates/forms/ directory.
If you have a syntactically invalid JSON file inside /backend/dis_templates/forms/ or /backend/dis_templates/models/, the model or form will not show up in the Template Manager. If the PHP and other files for those were already created, the corresponding forms will still show up in the list of forms but will show an error as soon as you try to open it.
In case you have a template file that does not show up in the Template Manager, check its syntax. Some commands (of many) to do so are:
json_xs -t none < sample.json # perlpython -m json.tool sample.json # pythonjq . sample.json # jq executable
All these perform the same "JSON Lint" job - they try to parse the file sample.json as JSON - if it is invalid JSON, they will print an error message and exit with a non-zero exit status. (Otherwise perl returns nothing, and python and jq return the file contents).
Generated PHP Files
For every model, four PHP files are created:
/backend/models/base/Base<Model>.php/backend/models/base/Base<Model>Search.php/backend/models/<Model>.php/backend/models/<Model>Search.php
The PHP files in /backend/models/base should never be modified, since they are overwritten by the Template Manager without asking. The PHP class Base<Model>.php contains validation rules and provides the data manipulation methods (save(), update(), delete(), etc.). The class in Base<Model>Search.php inherits from the previous class and contains the implementation needed to filter the data model records. This class is called by the hierarchical filter bar on top of some forms and by the "Filter By Values" feature.
The PHP files directly in /backend/models are generated mostly empty. You can add your specializations to those files; they will not automatically be overwritten by the Template Manager. The class in <Model>.php can contain specializations to the general features of the model. The class in <Model>Search.php can contain specializations to the search and filter features.
The class hierarchy is also explained in a longer document based on the "Cores" table.
Outside the Template Manager, the PHP files of a model (or of all domain models) can be generated or updated using the Yii command line: ./yii fix-data/update-models <model-name>
Type ./yii help fix-data/update-models to get more information on the parameters.
For every form, two PHP files are created:
/backend/forms/<Form>Form.php/backend/forms/<Form>FormSearch.php
For forms, we do not have the distinction of Base- and Instance-specific modified files yet.
The class in /backend/forms/<Form>Form.php inherits from the corresponding model's class. If there are specializations that belong to this specific form and not to all forms of the same model, they should be implemented here.
The class in /backend/forms/<Form>FormSearch.php inherits from the model's search class. If there are specializations concerning searching and filtering specific to this form, they should be implemented here.
Outside the Template Manager, the PHP files of a form (or of all forms) can be generated or updated using the Yii command line: ./yii fix-data/update-forms <form-name>
Type ./yii help fix-data/update-forms to get more information on the parameters.
Generated Vue files
For every form, a Vue file is created:
/src/forms/<Form>Form.vue.generated
This file can be seen as an example of a Vue file you can use to customize the user interface of a form. To modify the form, you have to rename it by removing the extension '.generated'. Change the source code and run npm run build. Now the customized form should be used. You will now see a warning in the Template Manager: "Code for this form was customized!". If you modify the form in the Template Manager, you could break the functionality of the form.
The Vue files with the extension '.generated' do not have any impact. For those forms, a default mechanism to display the form is used.
Database modifications
The Template Manager does not only create or update the JSON, PHP, and Vue files, it also applies the modifications to your database. Depending on your changes, it creates, modifies, or deletes tables in the database, adds, modifies (including renaming), or deletes columns, indices, and foreign keys.
Command Line Interface
Using ./yii fix-data/...
The Template Manager has an (unofficial) command line interface. It can be used to update (overwrite) models and forms.
To use it, you have to be in the root directory of your mDIS installation, where the yii command-line tool is located.
A list of all available commands can be shown by typing
./yii help fix-data.
This will return:
DESCRIPTION

These commands are used to fix issues in the data structure
and to automatically generate/update models and forms.


SUB-COMMANDS

- fix-data/update-combined-ids        Updates the combined_ids of a branch in the database, starting with one record
- fix-data/update-database-structure  Compares the database structure of the model template with that of the database
- fix-data/update-forms               Generates/updates forms based on the template files in backend/dis_templates/forms
- fix-data/update-igsn-numbers        Update the IGSN numbers of a model (i.e. CoreCore) or all models
- fix-data/update-models              Generates/updates models based on the template files in backend/dis_templates/forms
Useful commands to update domain models are, for example:
./yii fix-data/update-models CoreCore 1
./yii fix-data/update-models ArchiveFile 1
If you are adventurous:
./yii fix-data/update-models ALL overwrite
This command is equivalent to rebuilding every PHP file from the JSON files. This command can be destructive (unless you are familiar with git and source control). However, this custom yii subcommand will spare you a lot of clicks in the Template Manager GUI.
TODO
TODO: Describe other yii fix-data subcommands. Describe the yii commands to create stuff (= yii migrations).
TBC