
mDIS for Data Entry and Data Management
mDIS for Data Entry and Data Management
These pages contain an instruction manual for normal end users: Earth Scientists or Engineers.
More information is available:
mDIS Basics
Login
mDIS is a web based application. It does not require to install any application. Just open your browser and enter the address provided by your system administrator.
This is the login dialog:

Enter your user name or email address and the password. Only if your server can send emails out, it is possible to renew the password by email. In that case click on "Forgot Password".
If you are still logged in, you may directly get to the dashboard (see below).
Dashboard
After login the mDIS Dashboard opens. It provides common information for all users including project and mDIS information, simple data visualizations and a basic way for communicating news and updates.

The dashboard comprises several widgets, that can be modified in color, content and size to fit the project requirements. It is also possible to inactivate widgets. At the moment there are seven different widgets available:
- Project Information: enter information about this mDIS instance and add an image if desired. It also shows the version number (brown widget in screenshot).
- Messages of the day: enter a short information and add an image to it. Usually used for project updates and outreach purposes.
- Instructions: Enter links to e.g. the user documentation, tutorials, other files or to the database (grey-green widget in screenshot).
- Quick Post Box: leave short messages for other users.
- Scan QR Code (search IGSN code): enter or scan a QR code on a print label containing the IGSN. The correlated record will open in the appropriate form (not visible in screenshot).
- World Map: shows the location of the sites and/or holes in the database.
- Simple Charts: display data of the database in simple plots. Choose data by selecting the table and columns to show. E.g. core recovery vs. depth of the core table.
Every user can see the dashboard, but only users with developer or system administrator roles can modify widgets. To modify the dashboard click the "edit mode" button in the upper right corner (arrow in screenshot above). Now each widget gets at least two icons in the bottom left. A double column of three dots (drag points) and a gear.
- Move the mouse to the drag points and hold the left mouse button down to drag the widget to another position.
- The gear icon opens the settings of a widget. Here the widget information and its appearance can be modified. Some widgets can also be used multiple times (green sheets symbol). For example one widget can show an overview of different sites and another can show the holes of a site.

If a widget is not used, it can be found at the bottom of the dashboard under ‘inactive widgets’. To use it, just drag and drop it on the drag points to the desired position.
Ask your system administrator if you require additional widgets in your project. (How administrators can edit the dashboard)
In the footer at the bottom of the screen at the right, you have the option to switch between a dark (default) and a light theme. There is also the possibility to activate a more compact user interface.
The system administrator can edit the links of the footer and header using the system configuration.
Logout
To log out or edit / view your profile click on the person icon in the top right corner of the screen.
The Sidebar
The burger menu on the left opens the sidebar. To see the data stored in the mDIS, open the sidebar which is an overlay with several forms you can use.
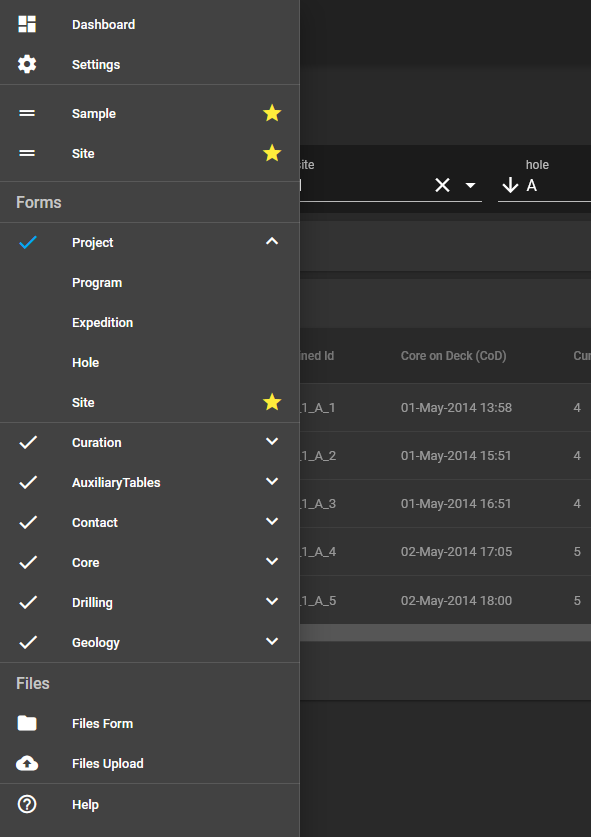
At the top, the dashboard and setting icons are visible.
Furthermore, all forms available to you in your mDIS instance are listed below grouped by Project, Curation, Contact, Core, Drilling, Geology, etc..
Click on one of those groups to open the list of contained forms. Depending on your mDIS instance and your access rights these groups and form can differ.
The data in mDIS is structured hierarchically usually starting on the highest level with Project -> Program. All forms are hierarchically linked by a parent and child relationship. For example, Hole is the parent to Cores, whereas cores is a child to Hole.
To easily access your frequently used forms, you can mark them as favorites by clicking on the star next to the form name. The favorite forms are shown at the top. You can remove a form from your favorites by unchecking the star. The favorite forms are saved in your user profile.
The list of uploaded files and the form to upload new files can be found at the bottom of the sidebar.
Forms
Forms comprise a central part of the DIS application. They can be used to insert, edit, delete, find, view, and export/print data.
Navigating by Hierarchy
The mDIS is structured hierarchically usually starting on the highest level with Project -> Program. The example shows the hierarchy levels of the GRIND expedition implemented in the mDIS from the top level program to the lowest levels samples, pieces and lithounits.

All forms are hierarchically linked by a parent, siblings and child relationship. For example, Hole is the parent to Cores, whereas cores is a child to Hole and a sibling to Driller-Reports and Fluid-samples.
Click on Program in the sidebar. A new window will open.
Two programs are implemented. You can choose between GESEP and ICDP. Click on ICDP. At the top the Program Details appear together with several colorful buttons.
Data Input
New Core Run
When logging into the mDIS the Dashboard opens. Click on the burger menu in the upper left corner and then on cores. Fill out the expedition, site and hole in the top. Then, the data in the list of records becomes visible for the selected hole.  Select the expedition, site and hole. Afterwards, you see all already existing cores in the List of records and you can type in or modify data under current record.
Under current record new cores can be entered. You can collapse or expand this section by clicking on the header. Here, all filtered records are displayed in a table.

- By clicking the new button, a new core is added. The core number and the top depth are calculated from the last core and filled in automatically.
- Fields with a star a mandatory. By entering the drilled length, the bottom depth is calculated automatically.
- For some fields, you can select the value from a list. If you have sufficient permissions, you can modify that list of values by clicking on the icon on the right of the dropdown field. In the modal dialog that opens, you can see all values available for that dropdown list. You can edit them, delete entries or create new ones. Clicking on the cross on the top left closes the dialog and you can go back to the form. Any updates of the list values are visible immediately, without refreshing the page.
- On date fields you can click on the clock to open a date selector.
- The number in section count divides the core into several sections that need to be further characterized on the next lower hierarchy level.
- The green button save saves the new entry and an IGSN and a combined ID are generated.
If a dataset needs to be changed, the core in the List of Records needs to be selected by clicking on it and then by clicking the orange edit button (Fig. 2). After modifying the data, the save button must be clicked.
In the List of Records all records are shown. You can choose which columns to show in the table by clicking on the blue button with three white rows left in the table head. A dropdown menu will be displayed, where you can select the columns you would like to see, and hide the other columns. If you click on the header of a column in the table, the records will be sorted by that column. You will see a small arrow to indicate the sort column. If you click on the same column header again the records will be sorted in reverse order.
New Sections
A child of a core is a section. With pressing the blue section button with the down pointing arrow, the lower level section opens in a new tab.

The newly entered core is pre-selected in the top row and the list of records will be opened, but if a new core was just entered no records exist.
- A new record is implemented by clicking on current record and on the button New.
- The section number, the top depth (and driller depth) are prefilled.
- The section length, core catcher and curator are mandatory fields, indicated by the star in front of the name.
- By saving, an IGSN and a combined ID are generated.
Repeat for all new sections.
That can be either done by clicking the New or Smart Copy buttons. The New button generates a new empty form and the Smart Copy button duplicates the last data entry and carries over values most likely to remain constant, while intelligently incrementing others.
Samples, Lithology and Lithological Units
Select a section in the list of records for further data input. You can choose between different children by clicking on the blue button with the down pointing arrow: Samples, Pieces or Lithounits.
In the Samples Form a new sample is created under current record and new. By filling out the form, the top depth is a relative depth within the section in cm.
In the Lithology Form a new record is created under current record and new. By filling out the form, the top depth is a relative depth within the section in cm. In the general lithology section of the form a generic selection for a lithological description is available and can be modified to match specific needs.
Often it is useful to define Lithological Units. Those units are linked to the Lithology Form and should simplify the data entry.
File Upload
The mDIS Drawer contains two similar items, Files Form and Files Upload.

1. Files Form
In the Files Form, you can browse files uploaded previously. The Files Form has a design similar to all other data input forms, and uses the same mechanisms to assign metadata.
There are two collapsible panels, Current File and List of Files.
List of files is a searchable data table, very similar to any other data table.
In the Current File panel area, the file metadata are displayed. They can also be edited. If the current file is an image that the system was able to convert automatically (e.g. from .tif to .jpg) during a previous file upload, you will also see a small preview of the image. Above the preview area, there is a link to download/open the file.
If someone has mis-assigned a file, e.g. some photo to a wrong core/section-record, you can remove the assignment. Then the original file will removed from the Files Form, be moved back to the Files Upload folder (see below), and you can use the Files Upload form to re-assign it to a different item.
File deletions are final
If you delete an item, the file in the file system (and the preview, converted versions, etc.) will be deleted as well. This cannot be undone, so be careful.
Form deletions and table/model deletions are also final. They can also not be reverted, unless you have a backup.
2. Files Upload
File Upload and Assignment (CK)
Files can be uploaded by pressing the "UPLOAD FILES" button in a form (if available) and by opening the File Upload from the sidebar. Each file (photo, document, etc.) is uploaded and assigned to a specific hierarchy level, which needs to be selected in "File Upload". The Upload File form consists of different parts and is used to assign files or to import values lists or records.
Before a file can be assigned, it must be uploaded into the system. By clicking on the area with the bluish dotted line at the top, the system explorer will open and allow the selection of files. By drag & drop of the file into the area, the upload is also initiated. Once the file is successfully uploaded, it will occur in the list below the upload area and is available for assignment.

💡 Newly uploaded files will be placed in the backend/data/upload folder on the mDIS server.
After the file is uploaded it can be selected in the upload directory. There are two different ways to fill the hierarchy to which the files should be assigned.
- Automatically
The hierarchy is filled automatically, if the "UPLOAD FILES" button in the corresponding form is pressed.
For example: Open the section form and select section 2 of core 5 of hole A, site 1, expedition 0000 in the filter bar. Then, click the "UPLOAD FILES" button. The File Upload form will open and all necessary hierarchy fields are prefilled with the selection.
- Manually
If the Files Upload form is accessed via the sidebar, the hierarchy needs to be selected manually. Keep the mDIS hierarchy in mind and omit those select-boxes that are not necessary.
For example: to assign an unrolled core scan to a section, only select the appropriate expedition, site, hole, core and section and leave all other hierarchy fields empty.

Also select the file type, optionally enter a number as an id or a counter. Depending on the file type this could be a core box number. Optionally, add some remarks. Furthermore, the "Upload Date" and the "Uploaded By" fields are mandatory and must always be filled. Then the files are assigned by pressing the button "ASSIGN SELECTED FILES". After successfully assigning metadata, the files will disappear from the File Upload form and are available under Files Management.
💡 newly assigned files will be moved on the mDIS server, in order to keep the data/upload directory a bit cleaner. Files will be physically moved from directory backend/data/upload/ to a new subdirectory with a name according to the item type, e.g. backend/data/upload/ArchiveBox.
Batch Assignment of Files
In case a lot of files should be assigned at once, it is possible to use the batch assignment. It is called "Template to set filters by file name" and is available in the File Upload form directly above the hierarchy field for expedition.
In order to use this, all files need to follow a consistent naming convention. ICDP uses the file type followed by the combined ID. E.g. an unrolled core scan would have the file name: CS_0000_1_C_012_3.jpg and a corebox BW_0000_1_C_CB002.jpg.
The templates for assignment are defined in a list and state which part of the file name relates to which hierarchy field. To assign unrolled core scans the template in ICDP would be <type>_<expedition>_<site>_<hole>_<core>_<section>*.*. The first is a wildcard allowing any kind of additional characters and the second allows the assignment of different file endings as e.g. jpg or png.
It is possible to add or modify the templates to reflect a different naming convention as long as the file naming is consistent.

💡 if using the batch assignment it is not necessary to select the hierarchy or the file type, but the mandatory fields "Upload Date" and "Uploaded By" need to be filled manually.
Reports, Exports and Actions
All reports, exports and actions can be accessed on the lower right side of the "current record" and of the "list of records" by clicking the brown export button. The opening menu contains three tabs with different export possibilities, REPORTS, EXPORTS, ACTIONS.

There are a lot of different reports, exports and actions for different purposes and on different hierarchical levels available. Here is an overview of the available reports, exports and actions.
Reports
Several different data and graphical reports as well as labels for printing are available. More details for specific reports are available here.
| Name | Short description |
|---|---|
| Core Boxes Summary | Overview of content of coreboxes (data and corebox photo) |
| Core Overview | Visual summary of sections in a core |
| Core Overview for IGSN | Visual summary of sections in a core for IGSN landing page. Works only with max. 1m sections and only with DMT CoreScans. |
| Corebox label | A print label with section data to stick to a corebox |
| Corebox label (small) | A print label with section data to stick to a corebox |
| Core label | CoreQrCodes labels |
| Cores with Sections | Overview of core and the corresponding section data |
| Crates overview | Shows splits and their summed weight in crates to be shipped |
| Cuttings label | A print label with cuttings data |
| Details of Records/ List of records | Opens records/list of records in a new browser tab |
| Expedition Events Overview | Overview of the number of sites and events/holes for all expeditions -> usually used on cruises |
| Expedition Events by Site | Overview of the number of sites and events per expedition -> usually used on cruises |
| Geo Sample Profile | Shows samples and visualizes the missing rock material in relation to a section image |
| Hole Overview | Visual summary of cores in a hole |
| Lithology/Section Report | Shows a section image and its basic lithology description |
| Pictures Report | Only in "File" reports. |
| Request Cover Sheet | Prints a PDF for sampling and manual input in the repository. Used at MARUM |
| Sample Label | A print label with sample data |
| Section Data Summary | Overview/ checklist of files uploaded in mDIS |
| Section Label | A print label with section data |
| Sites and Events (=Holes) | Overview of location of events -> usually used on cruises |
| Soft Core with Sections | Overview of core and section information. -> usually used for ocean or lake expeditions |
| Visual Core Description | Empty template with section image for lithological description |
| WR Samples Summary | Overview of core and the corresponding section data also showing samples taken at the Whole Round |
Exports
There are data exports, print reports and exports for use with other software. Details on different exports are available here.
| Name | Short description |
|---|---|
| Borehole Split Unit Profile as CSV file | Lithological summary over several sections depending on selected attributes. Only available for current record |
| CoreSectionsPdf | Only in Project/hole and Core/Core Forms |
| Export full records as CSV file | Exports records with a metadata header and database names of columns |
| Export records as CSV file | Exports records without metadata as displayed in mDIS |
| Export to Corelyzer | Export relevant data for use with Corelyzer |
| HierarchicalListCsv | Export records as CSV file - Hierarchically listed (not as a table) |
| IGSN export | XML export of data for IGSN registration. Will be replaced soon |
Actions
To allow data exchange, generation and manipulation in different data tables at once, several kind of "actions" exist. Details and more information on different actions are available here.
| Name | Short description |
|---|---|
| Assign storage location | Interactively assign coreboxes to storage location |
| Batch allocation of samples in container | Interactively assign samples to a container |
| Batch delete/ Recursive delete | Opens new tab to batch delete data in that form and/or delete data recursively in all hierarchy levels (only available for developer and Admin roles) |
| Batch edit | Opens new tab to batch edit data in that form |
| Completion Letter | Template of a Completion Letter that will be sent together with the sample to the requester. Can be manually modified |
| Create Sample Series | Only available for current record |
| Fill crates | Opens a new tab in which splits can be assigned to crates up to a maximum crate weight -> used only for shipping |
| Sample Sheet | Interval sampling a large number of samples (for Core Repository workflows, Sampling Parties) |
| Sample Sheet, BGR | Interval sampling a large number of samples (for BGR Core Repository workflows, Sampling Parties) |
| Split Sections | Interactively split the whole round into working and archive halves |
| Undo Sample Series | Only available for current record |
| Undo Section Splits | Interactively undo splitting |
Predefined User Roles
mDIS contains four predefined user roles: Viewer, Operator, Developer and System Administrator. Each of these roles can be modified regarding viewing and editing rights. Furthermore, the generation of custom roles is possible. mDIS Administrators create users (with username, password, and email), and then typically assign these users one of a handful of predefined roles.
mDIS Viewer role
- can only browse science data using existing forms
- can export/print/download the existing data using existing reports
- can see and read the dashboard
mDIS Operator role
The operator has the same rights as the Viewer Role with the following additions:
- can insert new data into existing data tables
- can modify (edit/delete) any of the existing data
- can use dashboard widgets
mDIS Developer role
The developer has the same rights as the Operator Role with the following additions:
- has access to the template manager to modify existing forms and tables or to generate new forms and data tables
- can modify the dashboard widgets
- can reset/change own password and email-address
Sysadmin (administrator) Role
The system administrator has the same rights as the Developer Role with the following addition:
- has access to the user management to enter new users, assign or create roles.
For more about the administrator role, please read the sysadmin documentation.
Modification of Predefined Roles
It is possible to assign multiple permissions to a user. For example a user with the role Viewer can get the additional permission to enter data in one specific form.
Note
Via roles, additional permissions can only extend a user's capabilities. It is not possible to remove permissions the user already has, e.g., by assigning "restrictions" (which are not supported).
Custom Roles
Custom Roles limit the access to and the visibility of records for specific datasets (e.g. Expeditions). For example, a user with the role Operator can see and edit records in every form, but only to the expeditions they have access to. Records from other expeditions will not be visible.
...
Click here for tutorials on how to create users, assign roles and permissions. (insert link, tbc)
Backup
Backups of mDIS VirtualBox Guests
By default, there exists a backup job that is scheduled to automatically run daily. The job puts database dumps and form designs into a single zip file. Usually these files are stored in directory backend/data/upload/backup/mysql . A typical filename of such a zipfile would be mysqldb_backup_mdis-GRIND--10.132.0.3--2020-04-03--dis.sql.zip.
Your system administrator might have changed these settings. Another common location to store those backups is directory /var/tmp/Upload.
For details and alternatives to make mDIS backups, read this extra document from the sysadmin documentation. For restore- operations, read this also: mysql backups.
You should agree with your system administrator on a strategy to make backups of files you create independently, such as photographs, core scans etc.
Tips and Tricks
Password Change:
- by users themselves:
- via the "Settings" page, "My Account" - implemented
- via the login screen, "Forgot Password" - not implemented
- on behalf of an Admin: implemented, accessible via the "Settings" page, "My Account"
Keyboard Shortcuts
The following Keyboard Shortcuts are defined:
{
  focusOnFilter        : 'alt+1',
  toggleFilterByValue  : 'alt+f',
  openFilterByValueForm: 'alt+shift+f',
  focusOnForm          : 'alt+2',
  new                  : 'alt+shift+n',
  edit                 : 'alt+shift+e',
  smartcopy            : 'alt+shift+d',
  delete               : 'alt+shift+del',
  save                 : 'alt+shift+s',
  cancel               : 'esc',
  focusOnTable         : 'alt+3',

  // defined but inactive
  // exportRecord  : '',
  // firstRecord   : '',
  // previousRecord: '',
  // nextRecord    : '',
  // lastRecord    : '',
}
For developers: They are defined in file src/util/shortcuts.js.
IGSNs
mDIS supports IGSNs, which are a standard format for publishing science data, and for identifying items globally (after publishing to the internet).