Forms
Forms
Related Pages
mDIS for Data Entry and Data Management
User Interface parts

The user interface of a form consists of several parts:
- Filter Bar (1): Located on top of any page, the filter bar allows us to select records based on the data hierarchy (expedition, site, hole, core, ...),
- or to apply a custom filter (2).
- Current Record (3): The Current Record panel can be collapsed and expanded to show the data of one selected record and allows to edit it. When a record is selected this panel is opened automatically.
- List of Records (4): The List of Records panel can be collapsed and expanded. It shows all records, or only a subset of records, if a filter was applied.
If you only want to look at some data you might want to collapse the "Current Record" panel. If you are on a data entry spree, i.e. you have to add many new records at a time, you might prefer to collapse the List of Records temporarily.
We will look at the user interface parts in reverse order as listed above:
List of records
If you open a form from the sidebar, the "current record" panel is collapsed, but the list of records panel is opened. 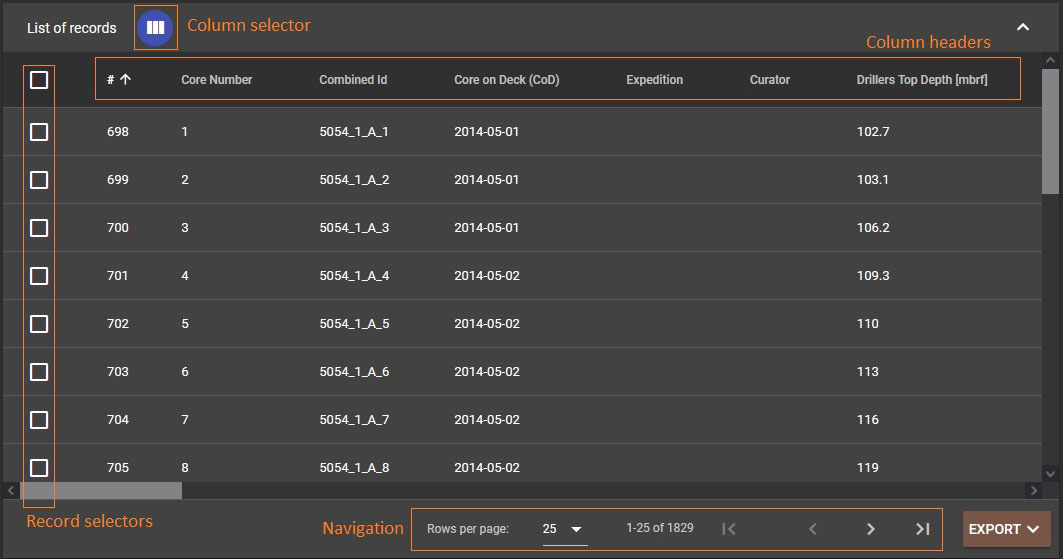 (Here an example for the form "core".)
The data is displayed as a table. The columns are labeled at the top (Column headers).
Below the header, the values of each record are displayed. To reach more records, you can use the scrollbar at the right to scroll down. The row with the column headers is fixed, so they stay at the top.
Since there can be huge amounts of records in a form, the are displayed paginated.
In the navigation area, you can select how many records shall be displayed on a single page or screen. This selection is saved with the form; if you come back to this form the value is preset. You can see which records are displayed and you can navigate to the previous or next page.
On the right of the navigation area, you can find a button to generate reports, export data or apply more complex actions to the records. Some of these functions consider the records selected. On the very left of the columns you can find the records selectors. Check those records you want export, generate reports for, etc. Use the checkbox in the header row to select deselect all records. You can only select records of the current pagination page. If no records are selected the selected function is applied to all records, not only the ones of this pagination page.
With the scrollbar at the bottom of the records you can scroll to the right to reach further columns. You can select which columns shall be displayed in the form by clicking on the column selector.
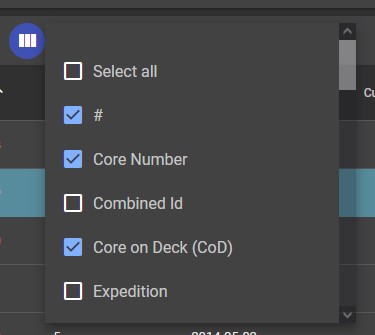
You can scroll down through the columns and select or deselect their visibility. Use "Select all" to select or deselect all columns with one (or two) clicks. The column "#" stands for the internal id of the record. The settings are saved with the form; if you come back to this form the selected columns are still set.
The vertical size of the "list of records" panel adapts to the space available. If you resize your window, collapse the "current record" panel, scroll down, etc. it will be resized automatically.
To see more data without scrolling, you can toggle the "Compact UI mode" found at the very bottom footer on the right, next to the dark/light theme switcher. 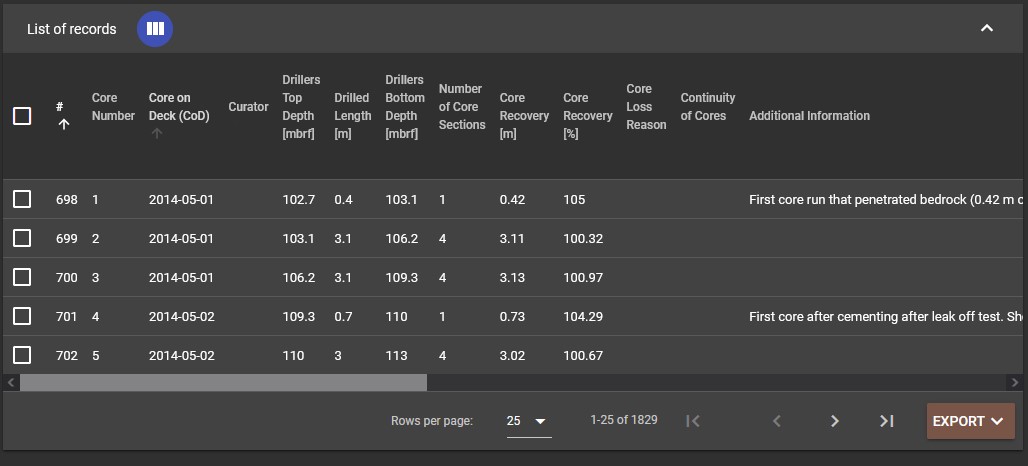 In compact mode, the column header lines are wrapped and there is less space between the records and columns.
To not see all but only selected records, you can use the filtering mechanisms described below.
Current record
If you select a record in the "list of records" panel, the "current record" panel is expanded.
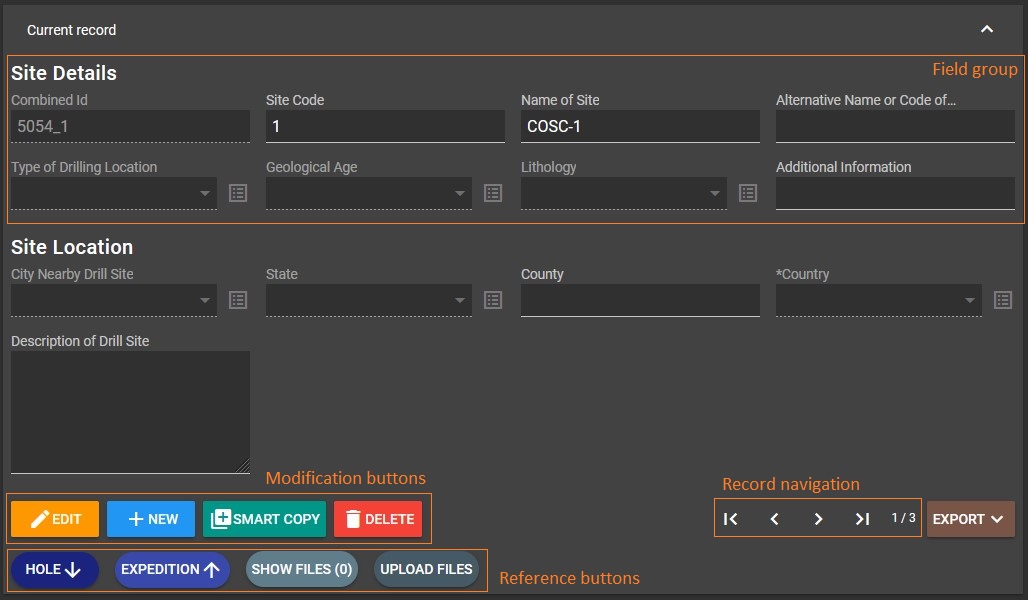 (Here an example for the form "site".)
The input fields are displayed in groups the can have a title. If the "Compact UI mode" (see above) is activated, all input fields are displayed without groups.
On the bottom right, you can find the navigation between the records and the information which record of how many records is displayed.
On the right of the navigation area, you can find a button to generate reports, export data or apply more complex actions to the current record.
At the bottom left you find buttons to open related forms. As mentioned before, the data structure of mDIS is widely hierarchical. The the example for form "site" shown above, "site" has a child form "hole" and a parent form "expedition".
If you click on the button to access the parent form (here "expedition"), the (one) record with the parent of this current record is displayed in that form in a new browser tab.
If you click on the button to access a child form (here "hole"), all the records the are children of the this current record are displayed in that form in a new browser tab.
The Show Files button shows in it's label how many files are associated to this record. If you click the form "Files Form" (that can also been accessed from the sidebar) is opened with preset filters, so that only uploaded files for the current record are shown.
The Upload button allows you to upload and assign files to the current record. The Form "Files Upload" is opened with preselected filters for the current record.
When opened, the data of the current record is displayed. Below the fields, you can find some buttons to modify the data:
Delete
You have to confirm your decision to delete the current record in a dialog.
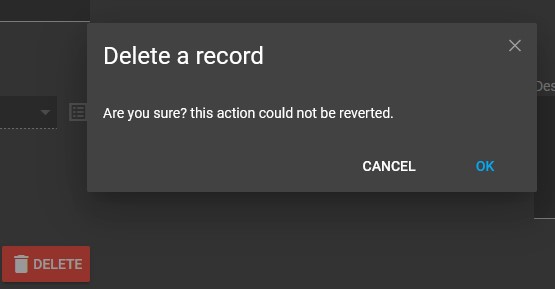
Records can only be deleted if no child or related records exist. If this is the case, you get an error message telling that the current record cannot be deleted.

If you intend to delete a record with all its children and descendant records and have the sufficient access rights, you can try the action "Batch delete / Recursive delete".
New
To create a new record, you first have to fill out the hierarchical filters (see below) to determine the parent record for the newly created one.
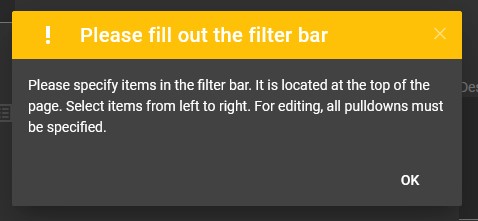
If you get the error dialog "Please fill out the filter bar" you have not filled out all items in the hierarchical filter.
The color of the input fields changes to blue (as the color of the button) to show you, that you create a new record. The new record is mostly empty except for some default values.
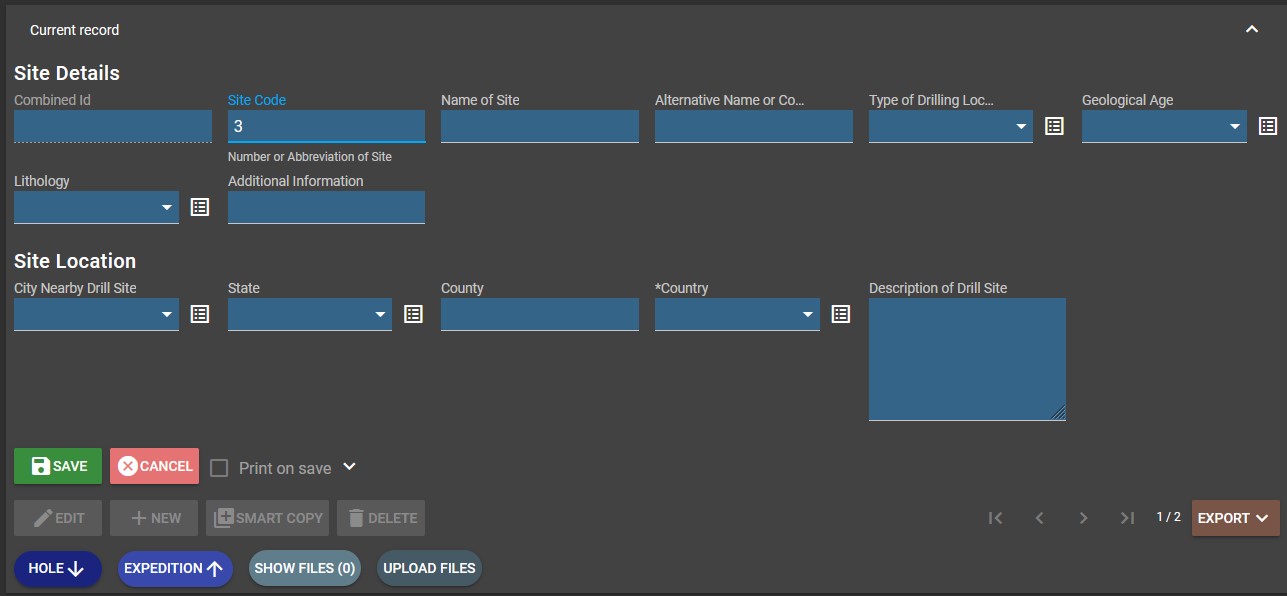
Only two buttons "Save" and "Cancel" are active.
See "Edit record" below to see more details on the input fields, validation, etc.
Smart copy
To create a copy from the current record, use this button.
As in "New record", you have to fill out the hierarchical filters and a new record is created.
Most values of the current record are being copied, others are auto incremented, etc.
Edit
The color of the input fields changes to orange (as the color of the button) to show you, that you edit an existing record.
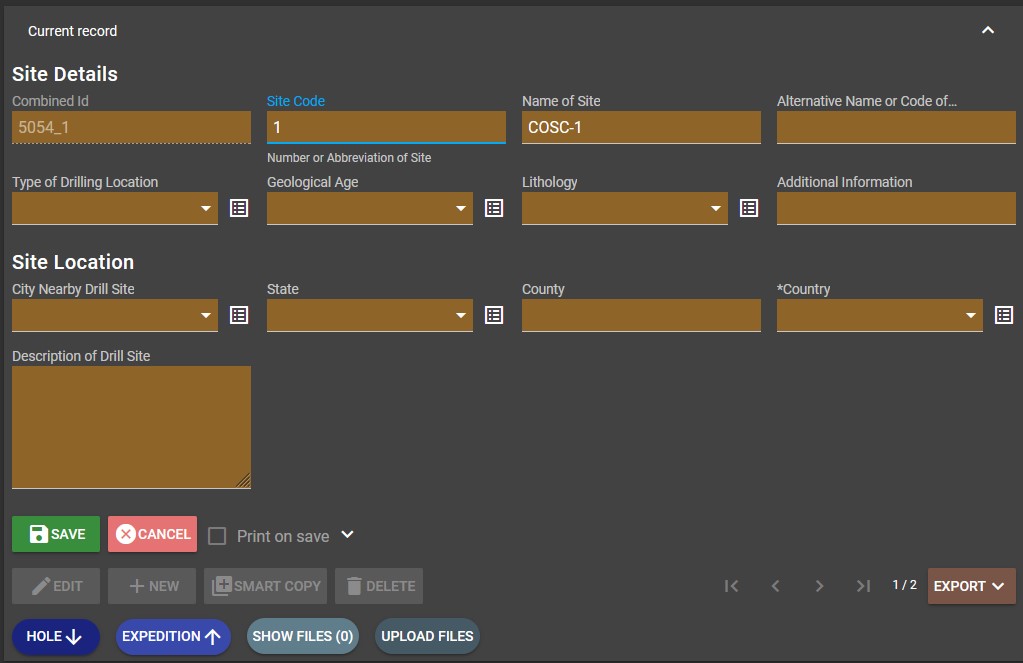
Except for some calculated, readonly or for other reasons disabled fields, you can now edit the data. Disabled fields are displayed with a dotted bottom line:
Depending on the data type and other settings, diffent input elements are used to edit the data.
Text
Normal input field for texts and numbers. If you enter decimal numbers, use "." as the decimal delimiter!
Textarea
Input for longer texts. Most browsers allow to change the size of the text area. You can enter line breaks.

Switch
Switch to toggle a yes/no value.
Date
Input to enter or select a date. If you click the clock on the right of the input field, the current date is used.
You can clear the value with the small "x" button in the input. If you click into the input field, you can either type in the date or use the popup to select it.
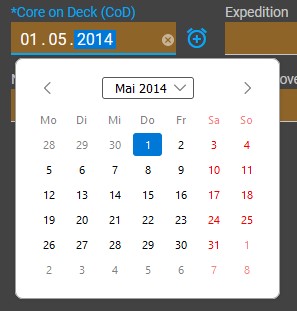
Datetime
Input to enter or select a date with a time.
Select
Input to select one or multiple values from a list.
If the data source for the selectable values is a value list, the button shown above on the right of the form input is displayed.
For other types of select inputs it could be that there are so many values, that these cannot be displayed all at once. In this case only the first few hundreds records are displayed. As soon as you enter a filter condition, the filtered records are fetched again from the server.
Validation of values
Filtering
Hierarchical Filters
Hierarchical Filters, or "Filter Bar", or Quick filters at top of page
In mDIS, we filter records by looking at how items are arranged in a structure that has levels ( see figure above, (1) ). Think of it like a family tree. A hole (like a parent) can have many cores (like children). On the flip side, a core always has one hole it belongs to, so if you want to find a core, you pick its hole. But since a hole is part of a site (like a grandparent), you need to pick the site first. That's why the filters in a form show you this family-like structure to pick from.
An all mDIS forms, those filter bars "remember" the values a user has set previously.
However, when you select a new value from the list of a filter element, previously selected values of the dependent filter elements (those "on the right" of that list) will be reset. For example, if you change the setting of the filter "site", the list of available values for hole and section will be reset.
Custom Form Filters

The "Create Filter" form
For certain items, e.g. cores, the table of items can grow to a size which can become inconvenient to display and paginate.
Thus, in addition to the hierarchical filter mentioned above, you can set custom filter conditions, e.g. "Show cores from a depth larger than 400 meters".
To do so, click on the button "Create Filter" (previously named Edit Filter) to open a modal form accepting you custom fiter expressions. The form has the same fields, arranged in the same sequence as the usual data-entry form in the "current record" section, but allows to enter filter expressions in any field, even in calculated fields.
This extra modal dialog is necessary to enter more complex, multi-field filter conditions. Below you find the different methods of filtering values. Press the button "Apply" to filter the records using the entered conditions. Using the Toggle Filter slider (previously named Filter by Values), you can switch the custom filter off and on. The filter bar will "remember" your filter expressions.
For filter expressions spanning multiple fields, values are combined with the AND logical connector. The logical OR operation is not supported currently.
Comparing numbers or dates
For columns that contain numbers or dates, you can use the mathematical operators >, <, ==, != to compare values. Prefix <> as equivalent for != is not supported.
Use == to test for equality. Prefix == means "equal to". Only relevant for string, date and datetime fields. No regex is used, the full value is compared.
< 6.3: Only values smaller than 6.3. Always use the dot to separate the fraction! Do not use the comma.>=6.3: Only values equal or bigger than 6.3. You do not have to write a space before the value.!= 3: Only values different from 3. Identical to<>3.> 2017-06-23: Only dates later than June 23rd, 2017. Always write dates in the formyyyy-mm-dd.< 2017-06-23 11:00: Only dates before 11:00. Please watch that you have to use UTC values for the comparison.
Text Search
For text and date fields you can just enter the value you are looking for. Strings are searched for using regular expressions. In mDIS, regular expression searches are by default case-insensitive. The following examples illustrate:
tube- The word "tube" has to be contained in the field. It does not matter, if it is written in upper or lower case letters.tube barrel- The whole text has to be contained in the field.barrels?- The character before the question mark is optional, so it matchesbarrelorbarrels.^tube- The field value has to start withtube.^stands for the start of the string.^MR$- The field value is exactlyMR.$stands for the end of the string.MR|HO- The field contains either the valueMRor the valueHO(or both).ICDP5063ECE.001-.stands as a placeholder for one character^ICDP50.*01$- The field starts withICDP50and ends with01.*stands for any amount (also none) of the character before it, in this case the placeholder...- Not empty. At least one character in the field.2017-10-- Any dates in October 2017[^BW]- Field values that do not start withBW.!=means NOT and can also be used before regex expressions on string, date, datetime. So!=abcmeans "does not containabc".- Prefix
!==meansnot identical. Only relevant for string, date and datetime fields. No regular expression is used. The full value is compared.==NULLand!==NULLcompares against numeric NULL values. =NULLsearches forNULLvalues in strings.
The following characters are Special Characters. They have a special meaning when they are used in Regular Expressions.
| Metacharacter(s) | Meaning |
|---|---|
^, $ | Start, and end, of string |
. | Placeholder for any character |
*, + | Quantifier of the previous character, + stands for 1 to n, * for 0 to n. |
(, ) | Groups of conditions; i.e. for alternative values in the midst of a string |
| ` | ` |
[ ] | character class |
\\ | Used to escape other characters; can be used to escape itself \\\\ |
A more detailed version of this table can be found in "perlre".
For searches for strings that actually contain these characters they must be "escaped", that means here: preceded with two backslashes. So for searching for a literal dot "." in a field, you would enter "\.", for US Dollars you would enter "US\$".
"QR Code Scanner" Filter
for handheld scanners connected via USB
If the form has a column "IGSN", mDIS shows a "QR Code Scanner" feature. Toggling this checkbox activates or deactivates the "search-by-qrcode" filter. This enables the use of a handheld scanner which sends the IGSN as the keyboard input. The IGSN sequence of characters is then entered into the custom filter field "IGSN" to filter the records.